Recently, I was asked to integrate Asterisk to VTiger CRM's PBX Manager module, so that all the Leads appeared as a 'click-to-call' link and the calls are placed via an internal VOIP Server. There were other features like call-recording and click-to-play recorded calls from the CRM as well as 'call-forwarding' and 'call-conference'. We will discuss these in some future posts. In this one, I would like to just jot down I steps I followed to build the VOIP Server. We will discuss the V-Tiger part later on.
Download Asterisk from their Official website
# tar -xzf asterisk-1.8-current.tar.gz
# cd asterisk-1.8.20.1
NOTE: Make sure you have gcc compiler pre installed in your system before moving towards next step
# ./configure
.$$$$$$$$$$$$$$$=..
.$7$7.. .7$$7:.
.$$:. ,$7.7
.$7. 7$$$$ .$$77
..$$. $$$$$ .$$$7
..7$ .?. $$$$$ .?. 7$$$.
$.$. .$$$7. $$$$7 .7$$$. .$$$.
.777. .$$$$$$77$$$77$$$$$7. $$$,
$$$~ .7$$$$$$$$$$$$$7. .$$$.
.$$7 .7$$$$$$$7: ?$$$.
$$$ ?7$$$$$$$$$$I .$$$7
$$$ .7$$$$$$$$$$$$$$$$ :$$$.
$$$ $$$$$$7$$$$$$$$$$$$ .$$$.
$$$ $$$ 7$$$7 .$$$ .$$$.
$$$$ $$$$7 .$$$.
7$$$7 7$$$$ 7$$$
$$$$$ $$$
$$$$7. $$ (TM)
$$$$$$$. .7$$$$$$ $$
$$$$$$$$$$$$7$$$$$$$$$.$$$$$$
$$$$$$$$$$$$$$$$.
configure: Package configured for:
configure: OS type : linux-gnu
configure: Host CPU : i686
configure: build-cpu:vendor:os: i686 : pc : linux-gnu :
configure: host-cpu:vendor:os: i686 : pc : linux-gnu :
Once the configure step is completed successfully you will see the above output on the screen
# make
# make install
# make samples
Once all the above steps are completed successfully it is time to start the asterisk services
# asterisk -vvvc Asterisk Ready.
*CLI>
Now let us configure some local extensions to verify extension-extension calling
Using ! (exclamation mark) will take you out of the asterisk CLI prompt but the service will be running in the background)
Or IF YOU WANT TO INSTALL WITH YUM Installing a binary distribution of Asterisk makes it easier to maintain your system. Using the package management tools that are included with your Linux distribution, you can install and update software without manually managing dependencies (libraries and utilities on which applications rely). Currently Asterisk is available for automated binary installation using the 'yum' utility on CentOS 5 Linux and for RedHat Enterprise Linux 5.
The first step is to add the Asterisk yum repositories to your CentOS or RedHat system. This is done by creating an entry in the yum configuration directory (/etc/yum.repos.d by default).
Use the text editor of your choice to create a new file named "centos-asterisk.repo" in the "/etc/yum.repos.d" folder. Add the following text to the file:
[asterisk-tested] name=CentOS-$releasever - Asterisk - Tested baseurl=http://packages.asterisk.org/centos/$releasever/tested/$basearch/ enabled=0 gpgcheck=0 #gpgkey=http://packages.asterisk.org/RPM-GPG-KEY-Digium [asterisk-current] name=CentOS-$releasever - Asterisk - Current baseurl=http://packages.asterisk.org/centos/$releasever/current/$basearch/ enabled=1 gpgcheck=0 #gpgkey=http://packages.asterisk.org/RPM-GPG-KEY-Digium
Save the new file and create another named "centos-digium.repo" and insert the following text: [digium-tested] name=CentOS-$releasever - Digium - Tested baseurl=http://packages.digium.com/centos/$releasever/tested/$basearch/ enabled=0 gpgcheck=0 #gpgkey=http://packages.digium.com/RPM-GPG-KEY-Digium [digium-current] name=CentOS-$releasever - Digium - Current baseurl=http://packages.digium.com/centos/$releasever/current/$basearch/ enabled=1 gpgcheck=0 #gpgkey=http://packages.digium.com/RPM-GPG-KEY-Digium
At this point your system has been updated to use the Asterisk and Digium repositories in addition to the base CentOS repositories. You are now ready to install Asterisk. To star the installation, execute the following at the Linux command line:
[root@localhost~]# yum install asterisk16 asterisk16-configs asterisk16-voicemail dahdi-linux dahdi-tools libpri
The system will respond with something like:
[root@localhost yum.repos.d]# yum install asterisk16 Loaded plugins: fastestmirror Loading mirror speeds from cached hostfile...
Type "y" for "Yes," press the Enter key and relax for a few minutes
Congratulations, you now have a CentOS or RedHat system with a complete version of Asterisk installed. Test out your new install by starting Asterisk:
[root@localhost yum.repos.d]# asterisk -vvvgci
Account
# cd /etc/asterisk
Take a backup of the original sip sile and create a new one with the followng details
# mv sip.conf sip.conf.orig
# vi sip.conf
[general]
port=5060
bindaddr=0.0.0.0
[1000]
type=friend
host=dynamic
secret=1000
[1001]
type=friend
host=dynamic
secret=1001
Now let me explain you the above used syntax
port - This is the port number which Asterisk uses to communicate
bindaddr - All the client IP range the server will listen to
type - type of connection (peer — outcoming calls only, user — incoming calls, friend — both incoming and outcoming calls)
host - Hostname of the phone (Dynamic Host name)
secret - Passsword used for authentication user
Configuring Extension Dial Plan
# mv extensions.conf extesnions.conf.orig
# vi extensions.conf
[general]
static=yes
writeprotect=no
priorityjumping=no
autofallthrough=yes
clearglobalvars=no
[default]
exten => 1000,1,Dial(SIP/1000,10)
exten => 1001,1,Dial(SIP/1001,10)
The above shown dial plan is one of the most basic which means that is a user dials 1000 from his extension using SIP Phone it will go to 1000 Extension and if the phone is not picked up till 10 seconds then the call will hangup. The same will happen for extension 1001
Now we are done with the initial configuration of Asterisk to verify internal calls. Restart the asterisk services
To connect to asterisk CLI
# asterisk -r
server*CLI>reload
This will reload all the configuration files of asterisk
Let us configure two softphones for verifying the calls
For this demo purpose I will be using X-Lite and QuteCom
You can download the same from the following locations
X-Lite
QueteCom
Once the softwares are downloaded and installed follow the below screenshots to configure your softphones
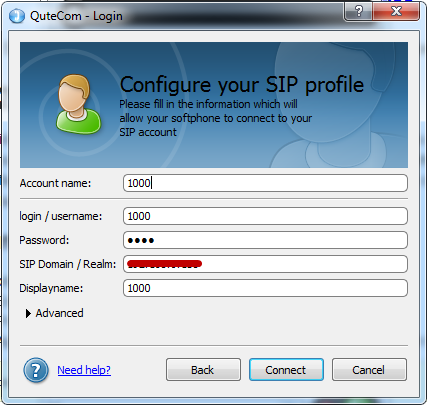
Configuring Extension 1000 on QueteCom
Use your server IP at the place for SIP Domain For example: 192.168.0.xx
Configuring Extension 1001 on X-Lite
Now when both the Softphones are configure try to make calls between each other
Calling from 1001 to 1000
So you can pick the call on the other side and start talking.
Now this was the most basic configuration of Asterisk but it can get very vast and complex moving more and more ahead.
Courtesy: http://www.golinuxhub.com


Excellent. You made my work simple
ReplyDeletePlease let me know the configurations for to make calls thro' PSTN, PRI or GAM gateway
Thank you
How many active calls can be made simultaneously. Or other words if I need to support 50 active calls what are all I need to take care.
ReplyDeleteThis Asterisk setup you just explained, how many SIP users can use it
ReplyDelete