Search Posts on Binpipe Blog

Amazon ECS Demonstration

ECS is the AWS Docker container service that handles the orchestration and provisioning of Docker containers. This was a write-up for AWS containers day demo, where I presented.

ECS Jargon

First we need to cover ECS terminology:
  • Task Definition — This a blueprint that describes how a docker container should launch. If you are already familiar with AWS, it is like a LaunchConfig except instead it is for a docker container instead of a instance. It contains settings like exposed port, docker image, cpu shares, memory requirement, command to run and environmental variables.
  • Task — This is a running container with the settings defined in the Task Definition. It can be thought of as an "instance" of a Task Definition.
  • Service — Defines long running tasks of the same Task Definition. This can be 1 running container or multiple running containers all using the same Task Definition.
  • Cluster — A logic group of EC2 instances. When an instance launches the ecs-agent software on the server registers the instance to an ECS Cluster. This is easily configurable by setting the ECS_CLUSTER variable in /etc/ecs/ecs.config described here.
  • Container Instance — This is just an EC2 instance that is part of an ECS Cluster and has docker and the ecs-agent running on it.
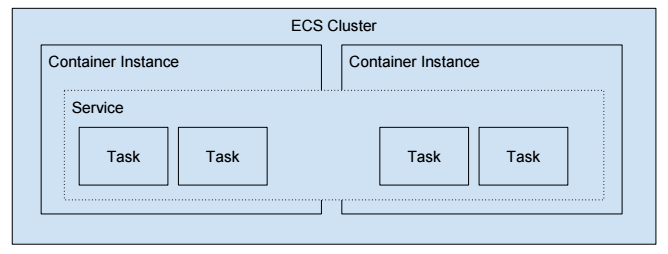
I remember when I first got introduced to the all the terms, I quickly got confused. AWS provides nice detailed diagrams to help explain the terms. Here is a simplified diagram to help visualize and explain the terms.

In this diagram you can see that there are 4 running Tasks or Docker containers. They are part of an ECS Service. The Service and Tasks span 2 Container Instances. The Container Instances are part of a logical group called an ECS Cluster.
I did not show a Task Definition in the diagram because a Task is simply an "instance" of Task Definition.

Tutorial Example

In this tutorial example I will create a small Sinatra web service that prints the meaning of life: 42. (https://www.independent.co.uk/life-style/history/42-the-answer-to-life-the-universe-and-everything-2205734.html)
  1. Create ECS Cluster with 1 Container Instance
  2. Create a Task Definition
  3. Create an ELB and Target Group to later associate with the ECS Service
  4. Create a Service that runs the Task Definition
  5. Confirm Everything is Working
  6. Scale Up the Service to 4 Tasks.
  7. Clean It All Up
The ECS First Run Wizard provided in the Getting Started with Amazon ECS documentation performs the similar above with a CloudFormation template and ECS API calls. I'm doing it out step by step because I believe it better helped me understand the ECS components.
1. Create ECS Cluster with 1 Container Instance
Before creating a cluster, let's create a security group called my-ecs-sg that we'll use.
aws ec2 create-security-group --group-name my-ecs-sg --description my-ecs-sg
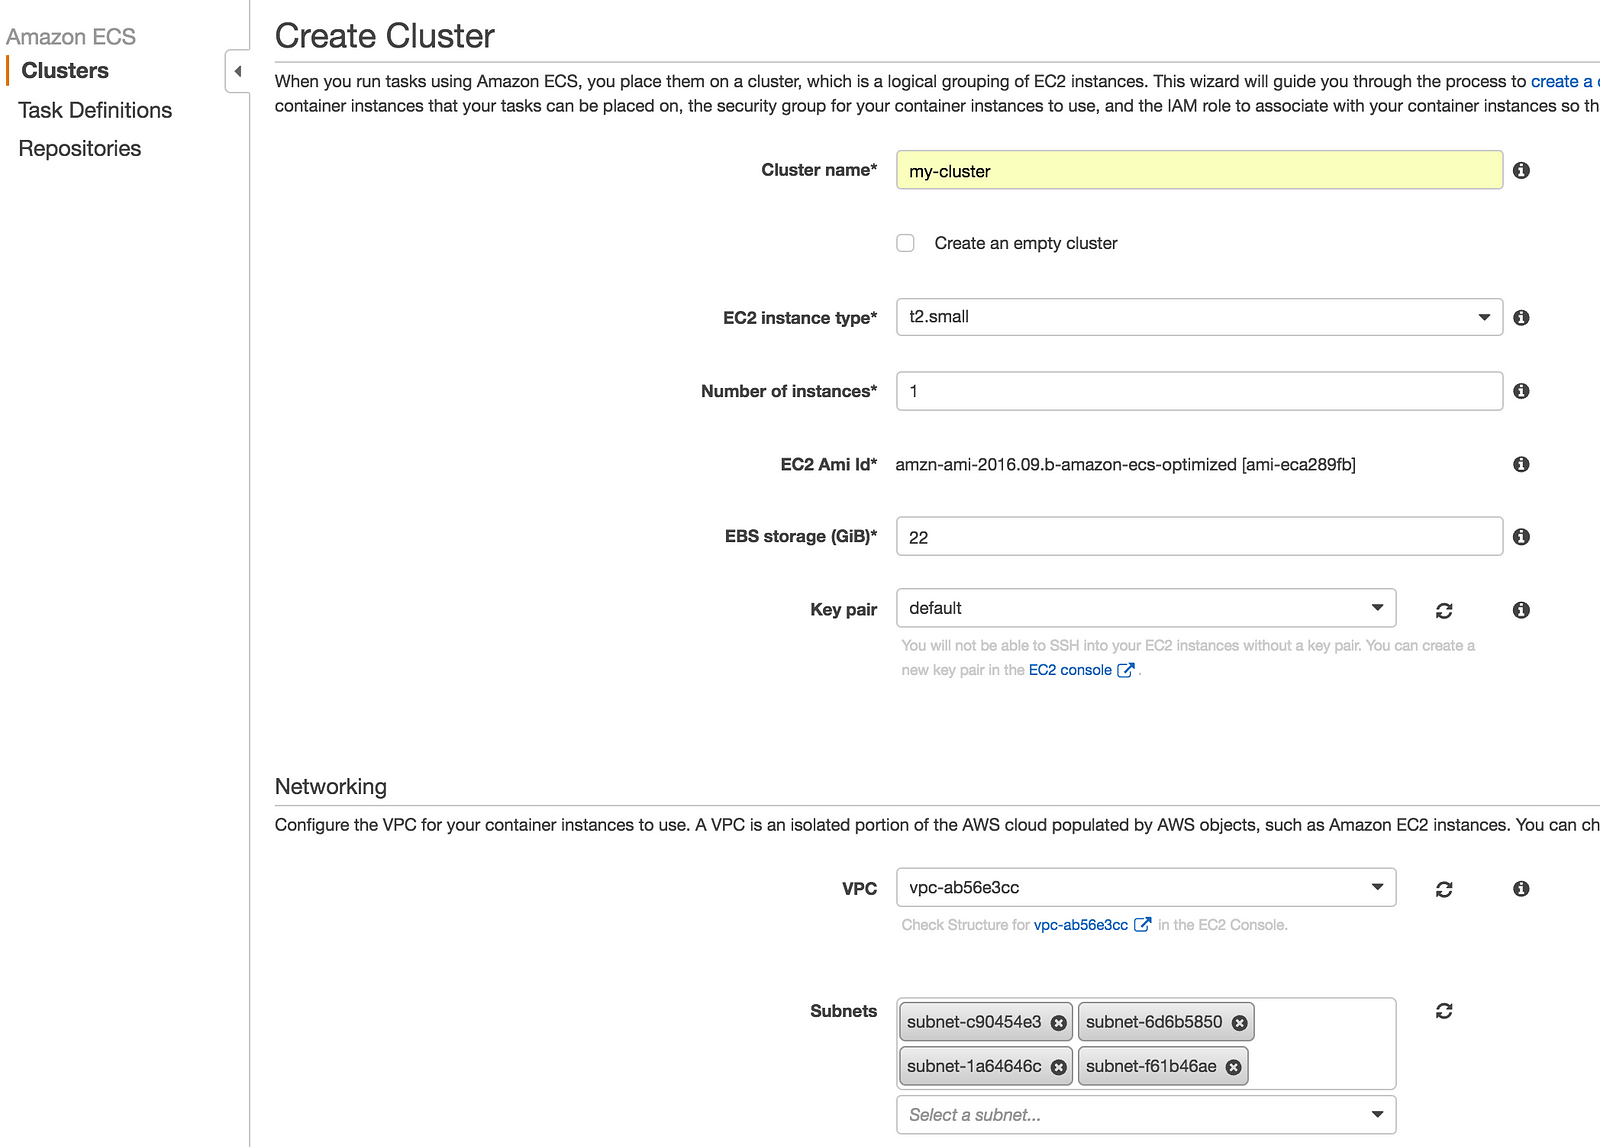
Now create an ECS Cluster called my-cluster and the ec2 instance that belongs to the ECS Cluster. Use the my-ecs-sg security group that was created. You can get the id of the security group from the EC2 Console / Network & Security / Security Groups. It is important to select a Key pair so you can ssh into the instance later to verify things are working.
For the Networking VPC settings, I used the default VPC and all the Subnets associated with the account to keep this tutorial simple. For the IAM Role use ecsInstanceRole. If ecsInstanceRole does not yet exist, create it per AWS docs. All the my settings are provided in the screenshot. You will need to change the settings according to your own account and default VPC and Subnets.
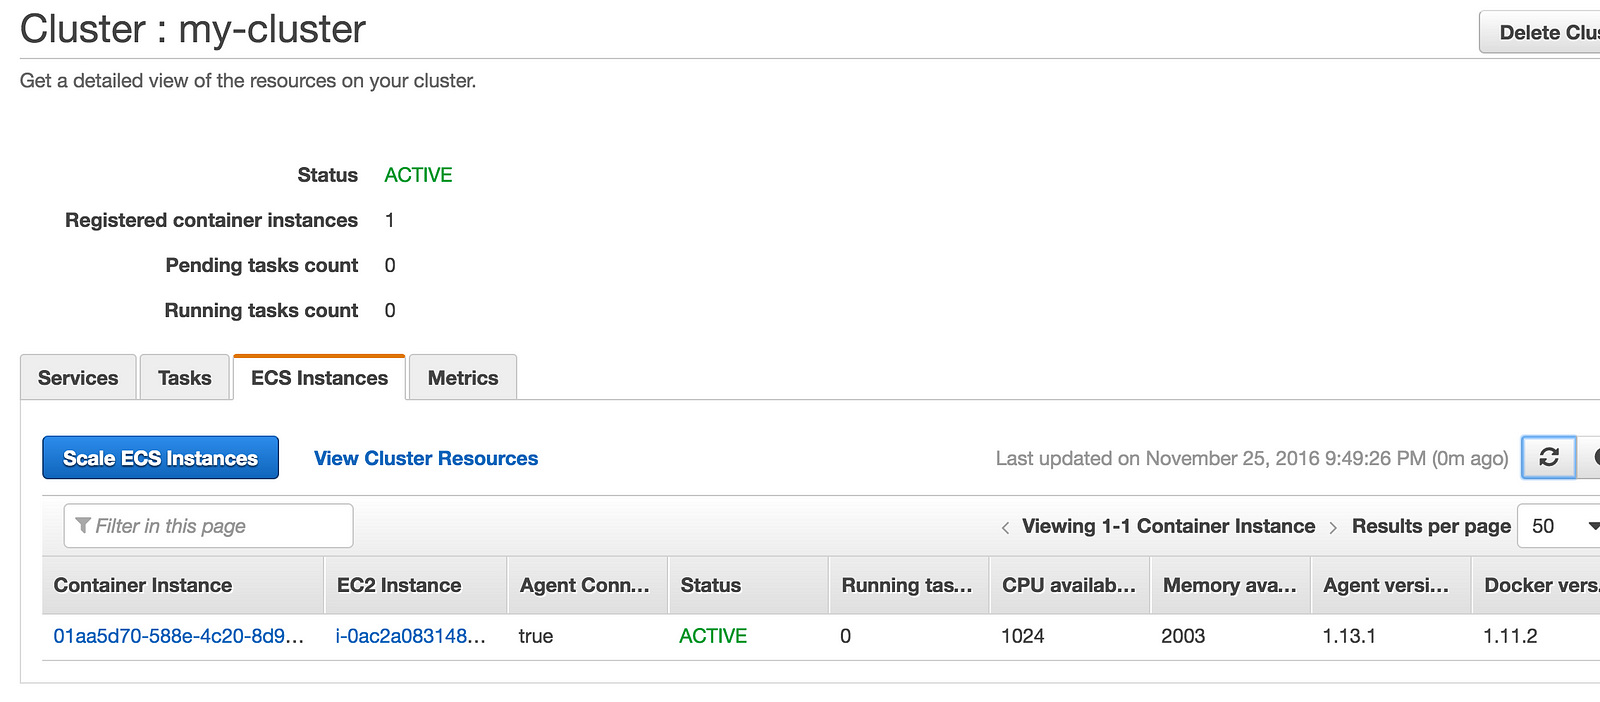
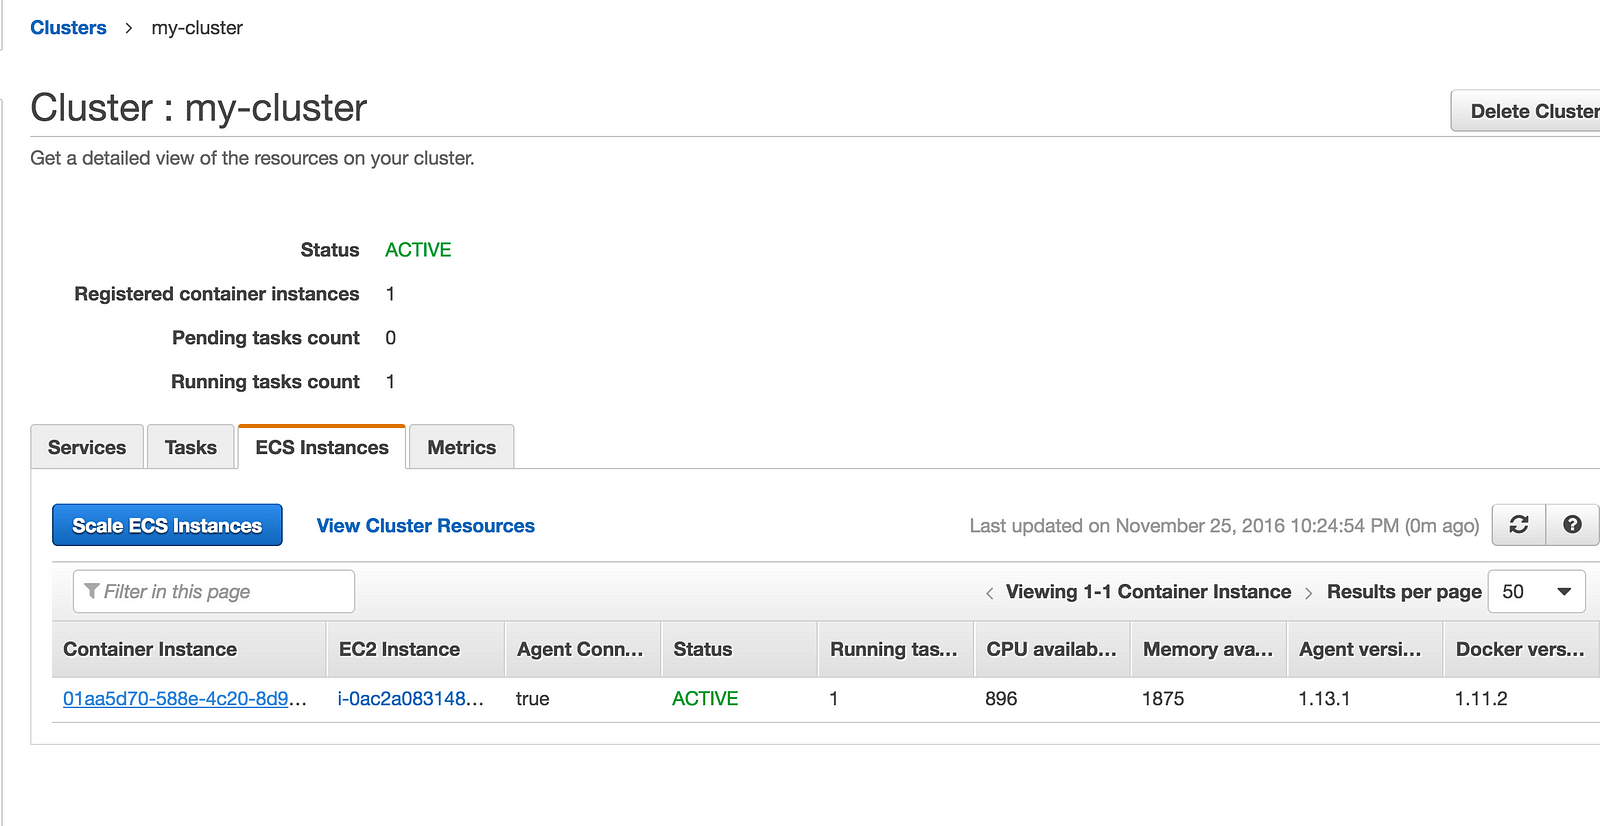
Wait a few minutes and the confirm that the Container Instance has successfully registered to the my-cluster ECS cluster. You can confirm it by clicking on the ECS Instances tab under Clusters / my-cluster.
2. Create a task definition that will be blueprint to start a Sinatra app
Before creating the task definition, find a sinatra docker image to use and test that it's working. I'm using the tongueroo/sinatra image.
$ docker run -d -p 4567:4567 --name hi tongueroo/sinatra
6df556e1df02e93b05aa46425fc539121f5e50afee630e1cd918b337c3b6c202
$ docker ps
CONTAINER ID        IMAGE                COMMAND             CREATED             STATUS              PORTS                    NAMES
6df556e1df02        tongueroo/sinatra   "ruby hi.rb"        2 seconds ago       Up 1 seconds        0.0.0.0:4567->4567/tcp   hi
$ curl localhost:4567 ; echo
42
$ docker stop hi ; docker rm hi
$
Above, I've started a container with the sinatra image and curl localhost:4657. Port 4567 is the default port that sinatra listens on and it is exposed in the Dockerfile. It returns "42" as expected. Now that I've tested the sinatra image and verify that it works, let's create the task definition. Create a task-definition.json and add:
{
  "family": "sinatra-hi",
  "containerDefinitions": [
    {
      "name": "web",
      "image": "tongueroo/sinatra:latest",
      "cpu": 128,
      "memoryReservation": 128,
      "portMappings": [
        {
          "containerPort": 4567,
          "protocol": "tcp"
        }
      ],
      "command": [
        "ruby", "hi.rb"
      ],
      "essential": true
    }
  ]
}
The task definition is also available on GitHub: task-definition.json. To register the task definition:
$ aws ecs register-task-definition --cli-input-json file://task-definition.json
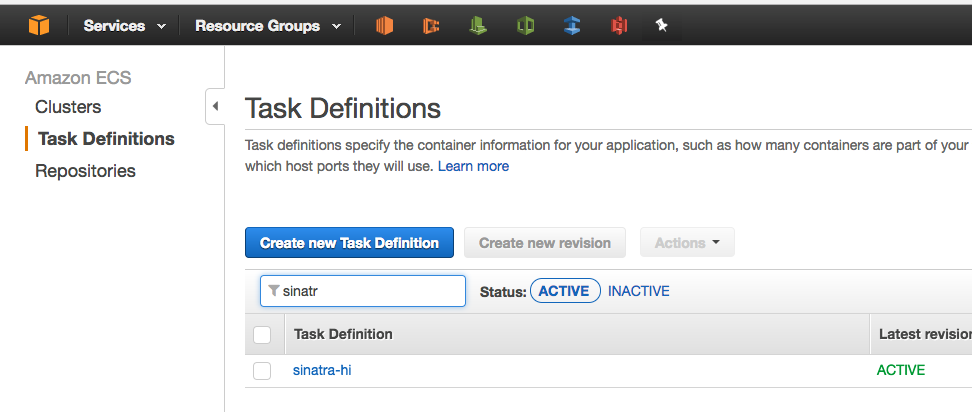
Confirm that the task definition successfully registered with the ECS Console:
3. Create an ELB and Target Group to later associate with the ECS Service
Now let's create an ELB and a target group with it. We are creating an ELB because we eventually want to load balance requests across multiple containers and also want to expose the sinatra app to the internet for testing. The easiest way to create an ELB is with the EC2 Console.
Go the EC2 Console / Load Balancing / Load Balancers, click "Create Load Balancer" and select Application Load Balancer.
Wizard Step 1 — Configure Load Balancer
  • Name it my-elb and select internet-facing.
  • Use the default Listener with a HTTP protocol and Port 80.
  • Under Availability Zone, chose a VPC and choose the subnets you would like. I chose all 4 subnets in the default VPC just like step 1. It is very important to chose the same subnets that was chosen when you created the cluster in step 1. If the subnets are not the same the ELB health check can fail and the containers will keep getting destroyed and recreated in an infinite loop if the instance is launched in an AZ that the ELB is not configured to see.
Wizard Step 2 — Configure Security Settings
  • There will be a warning about using a secure listener, but for the purpose of this exercise we can skip using SSL.
Wizard Step 3 — Configure Security Groups
  • Create a new security group named my-elb-sg and open up port 80 and source 0.0.0.0/0 so anything from the outside world can access the ELB port 80.
Wizard Step 4 — Configure Routing
  • Create a new target group name my-target-group with port 80.
Wizard Step 5 — Register Targets
  • This step is a little odd for ECS. We do actually not register any targets here because ECS will automatically register the targets for us when new tasks are launched. So simply skip and click next.
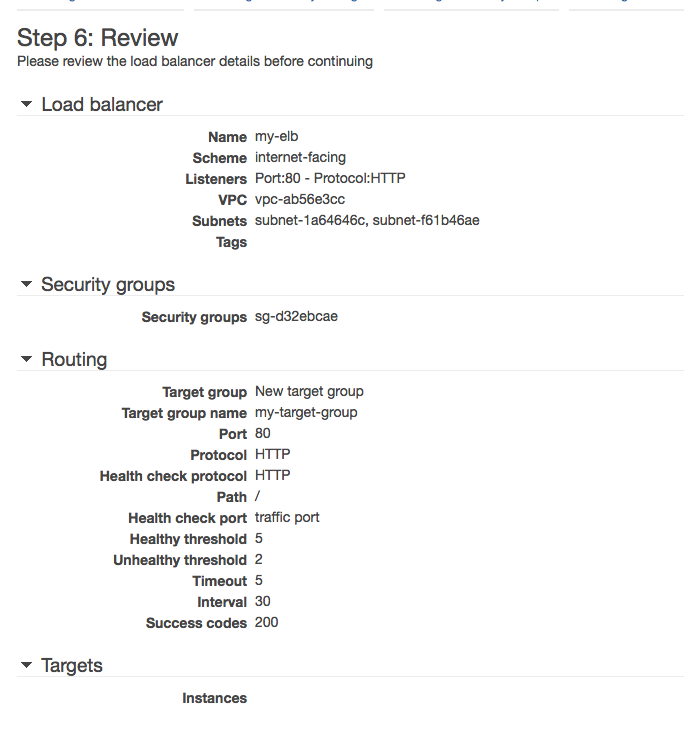
Wizard Step 6 — Review
  • Review and click create.
When we created the ELB with the wizard we opened it's my-elb-sg group port 80 to the world. We also need to make sure that the my-ecs-sg security group associated with the instance we launched in step 1 allows traffic from the ELB. We created the my-ecs-sg group in step 1 at the very beginning of this tutorial. To allow all ELB traffic to hit the container instance run the following:
$ aws ec2 authorize-security-group-ingress --group-name my-ecs-sg --protocol tcp --port 1-65535 --source-group my-elb-sg
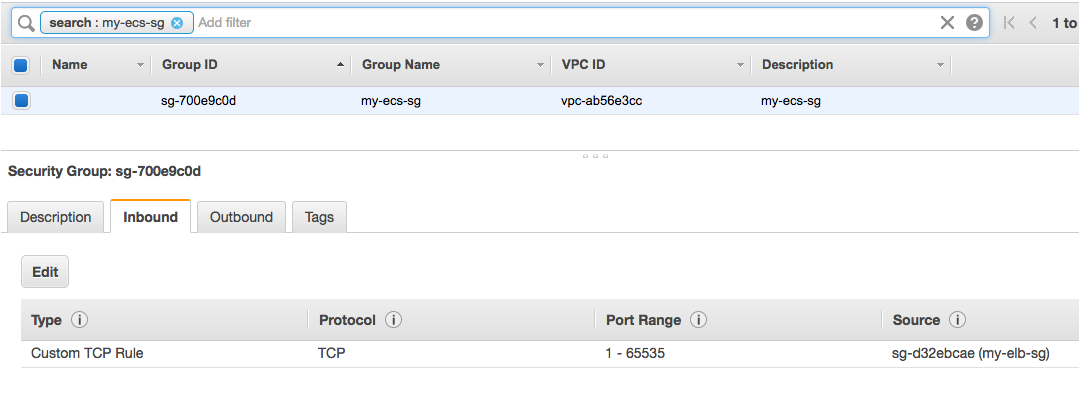
Confirm the rules were added to the security groups via the EC2 Console:
With these security group rules, only port 80 on the ELB is exposed to the outside world and any traffic from the ELB going to a container instance with the my-ecs-group group is allowed. This a nice simple setup.
4. Create a Service that runs the Task Definition
The command to create the ECS service takes a few parameters so it is easier to use a json file as it's input. Let's create a ecs-service.json file with the following:
{
    "cluster": "my-cluster",
    "serviceName": "my-service",
    "taskDefinition": "sinatra-hi",
    "loadBalancers": [
        {
            "targetGroupArn": "FILL-IN-YOUR-TARGET-GROUP",
            "containerName": "web",
            "containerPort": 4567
        }
    ],
    "desiredCount": 1,
    "role": "ecsServiceRole"
}
You will have to find your targetGroupArn created in step 3 when we created the ELB. To find the targetGroupArn you can go to the EC2 Console / Load Balancing / Target Groups and click on the my-target-group.
Now create the ECS service: my-service.
$ aws ecs create-service --cli-input-json file://ecs-service.json
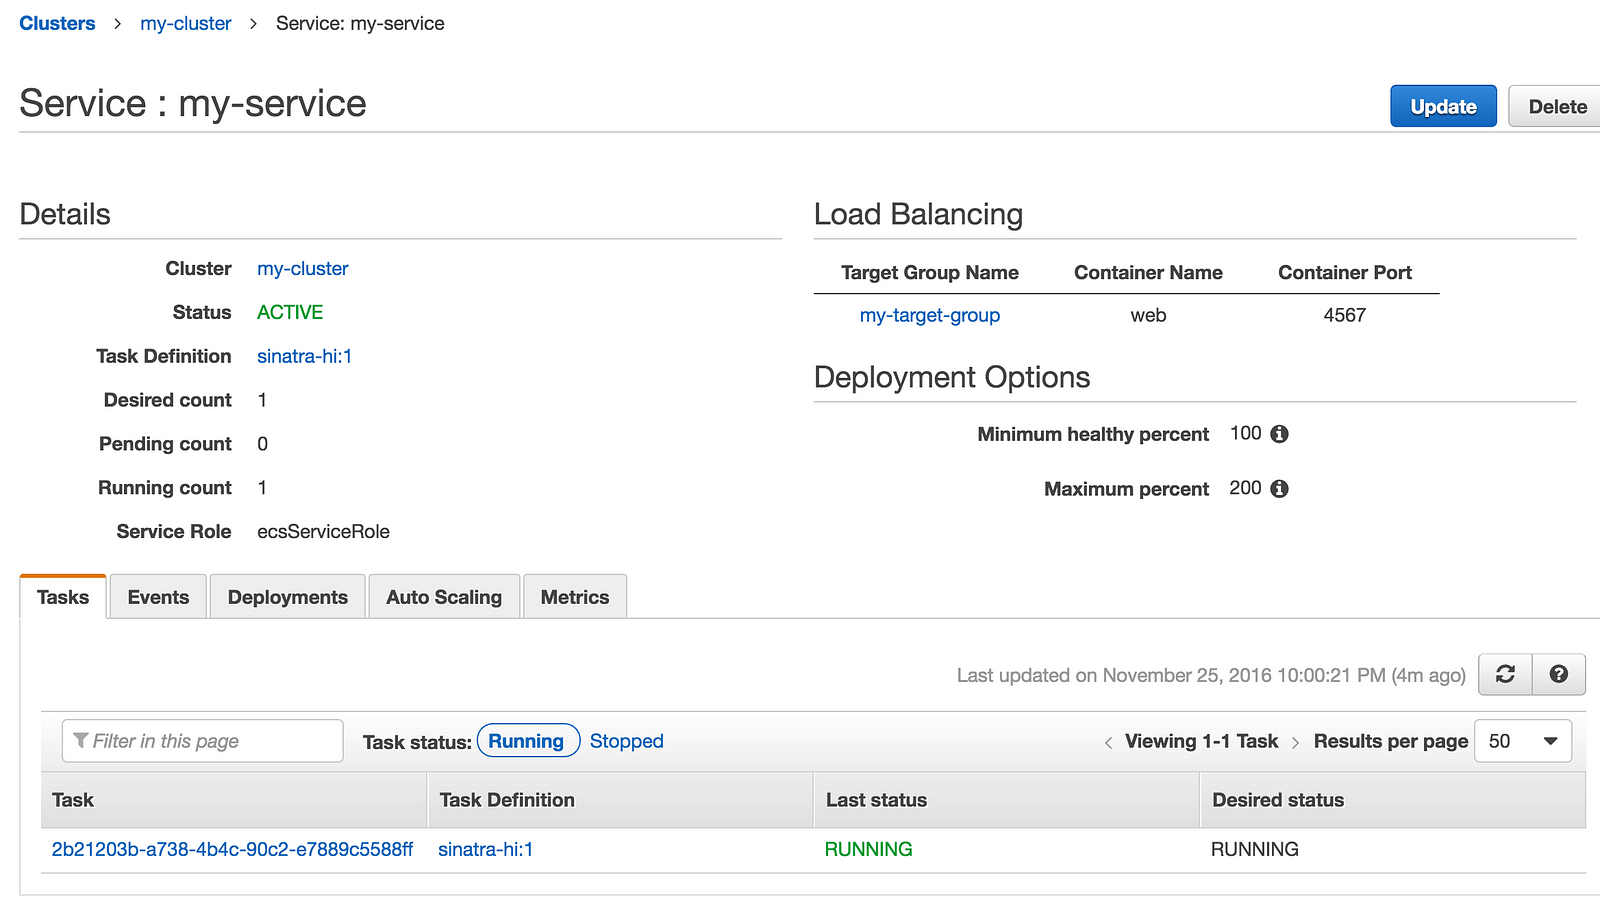
You can confirm that the container is running on the ECS Console. Go to Clusters / my-cluster / my-service and view the Tasks tab.
5. Confirm Everything is Working
Confirm that the service is running properly. You want to be thorough about confirming that all is working by checking a few things.
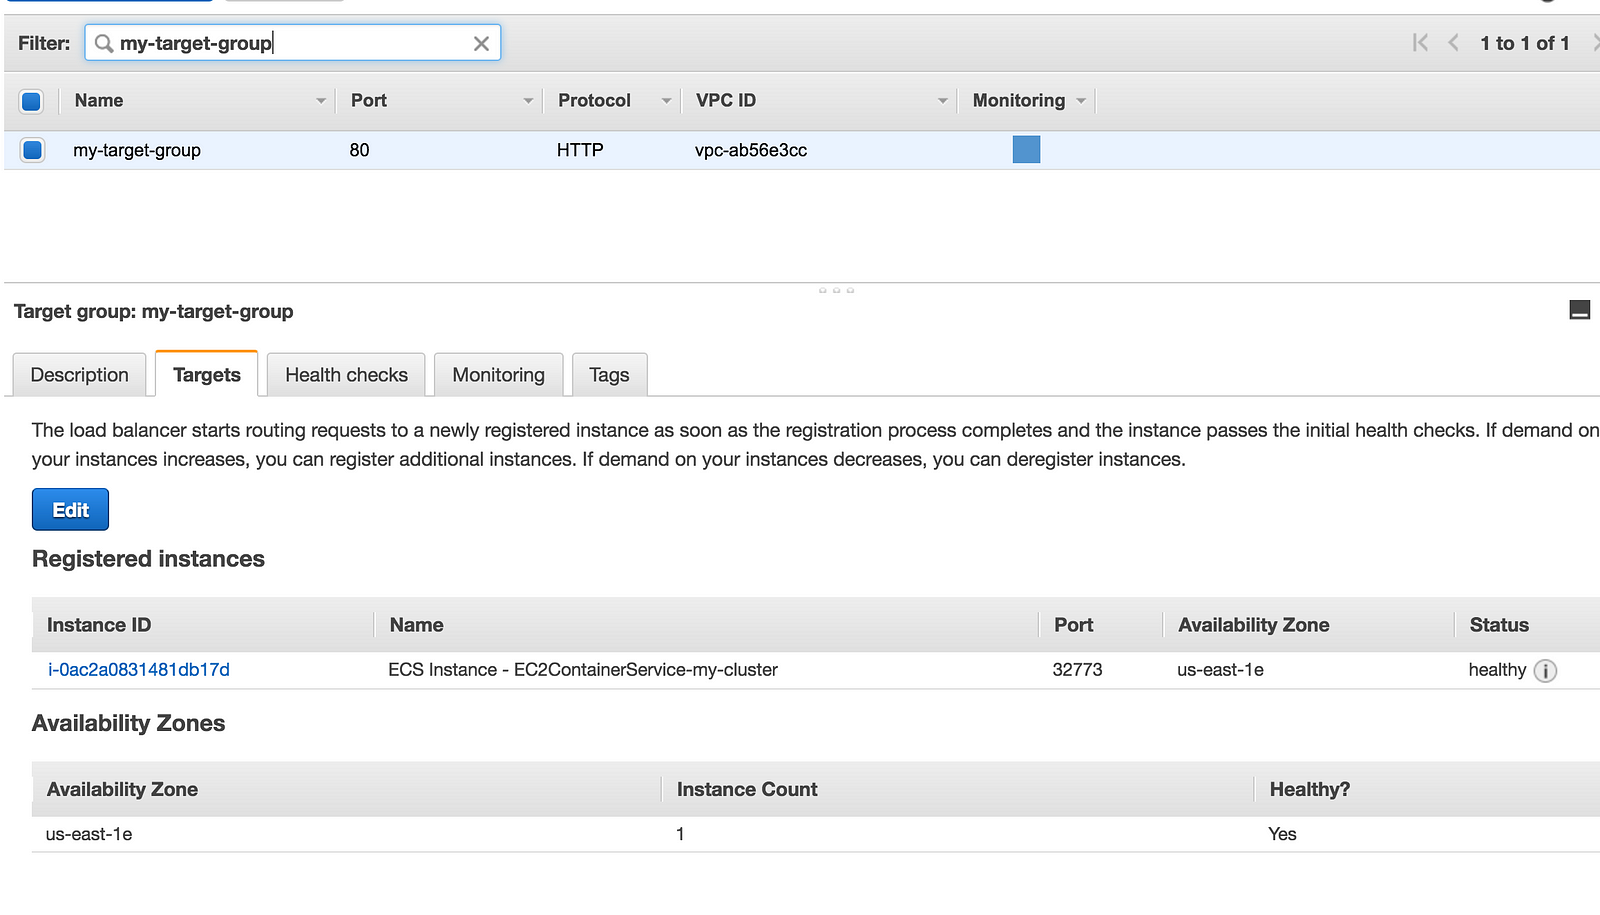
Check that my-target-group is showing and maintaining healthy targets. Under Load Balancing / Target Groups, click on my-target-group and check the Targets tab. You should see a Target that is reporting healthy.
If the target is not healthy, check these likely issues:
  • Check that the my-ecs-sg security group is allowing all traffic from the my-elb-sg security group. This was done in Step 4 with the authorized-security-group-ingress command after you created the ELB.
  • Check that the security groups for the ELB, in step 3, is set to the same security groups that you use when you created the ECS Cluster and Container Instance in step 1. Remember the ELB can only detect healthy instances in AZs that it is configure to use.
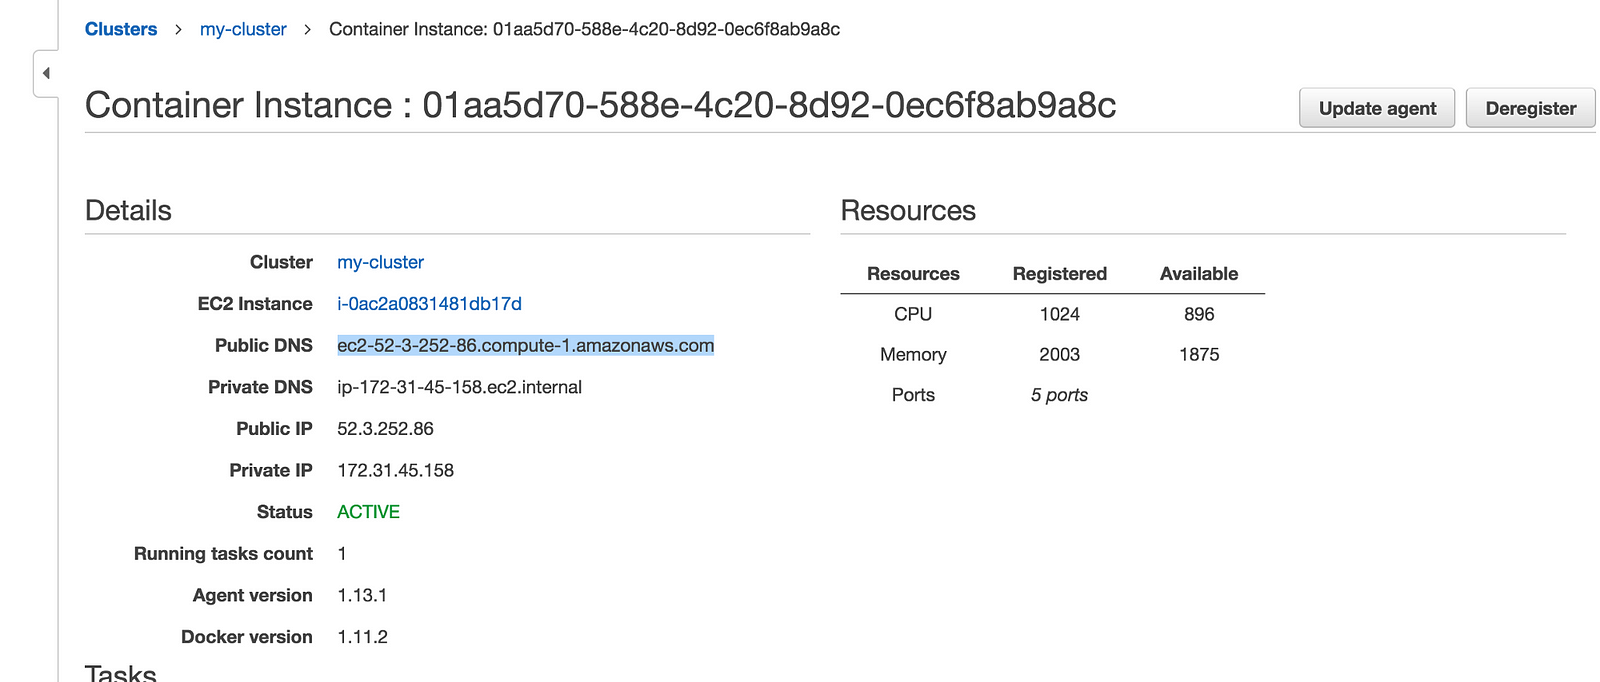
Let also ssh into the instance and see the running docker process is returning a good response. Under Clusters / ECS Instances, click on the Container Instance and grab the public dns record so you can ssh into the instance.
$ ssh ec2-user@ec2-52-3-252-86.compute-1.amazonaws.com
$ docker ps
CONTAINER ID        IMAGE                            COMMAND             CREATED             STATUS              PORTS                               NAMES
9e9a55399589        tongueroo/sinatra:latest        "ruby hi.rb"        16 minutes ago      Up 16 minutes       8080/tcp, 0.0.0.0:32773->4567/tcp   ecs-sinatra-hi-1-web-d8efaad38dd7c3c63a00
4fea55231363        amazon/amazon-ecs-agent:latest   "/agent"            41 minutes ago      Up 41 minutes                                           ecs-agent
$ curl 0.0.0.0:32773 ; echo
42
$
Above, I've verified that the docker container running on the instance by curling the app and seeing a successful response with the "42" text.
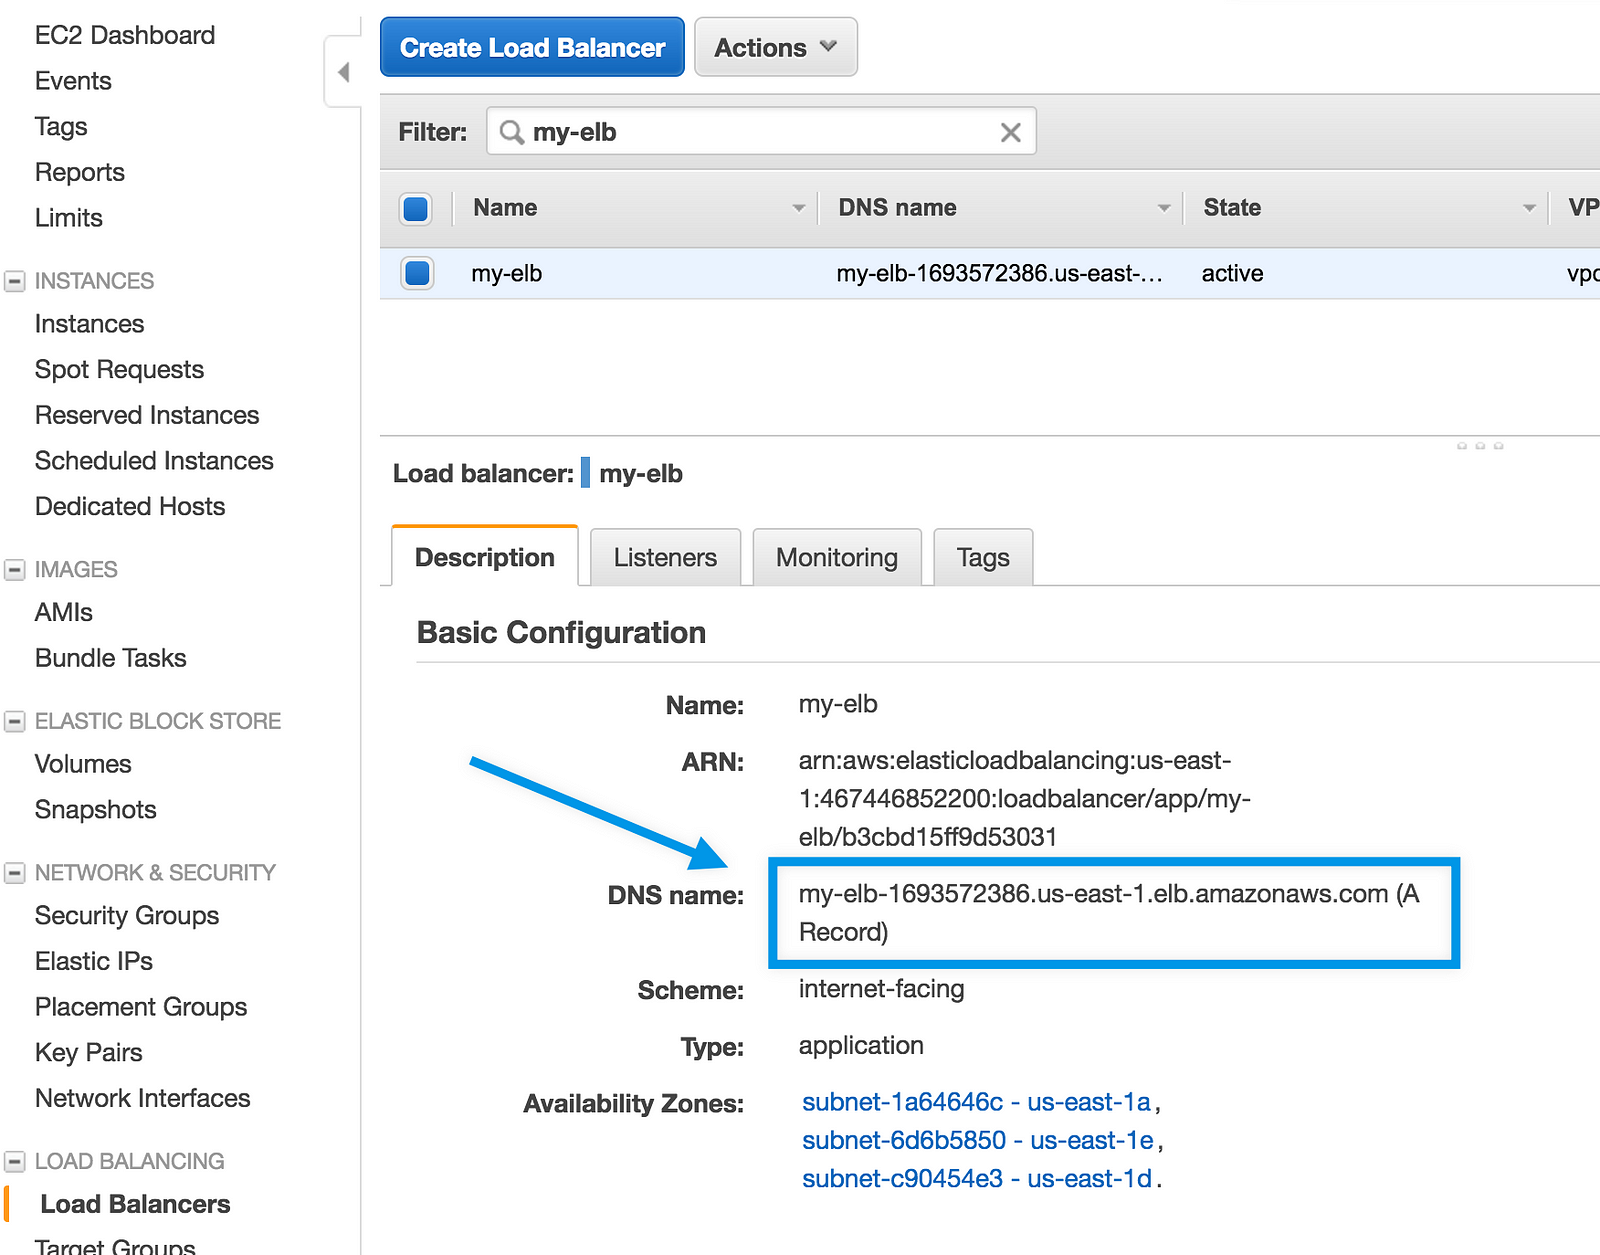
Lastly, let's also verify by hitting the external DNS address of the ELB. You can find the DNS address in the EC2 Console under Load Balancing / Load Balancers and clicking on my-elb.
Verify the ELB publicly available dns endpoint with curl:
$ curl my-elb-1693572386.us-east-1.elb.amazonaws.com ; echo
42
$
6. Scale Up the Service to 4 Tasks
This is the easiest part. To scale up and add more containers simply go to Clusters / my-cluster / my-service and click on "Update Service". You can change "Number of tasks" from 1 to 4 there. After only a few moments you should see 4 running tasks. That's it!
7. Clean It All Up
It is quickest to use the EC2 Console to delete the following resources:
  • ELB: my-elb
  • ECS Service: my-service Task Definition: sinatra-hi Cluster: my-cluster
  • Security group: my-elb-sg and my-ecs-sg.

Service Discovery with Eureka (Netflix OSS)

Service Discovery is one of the key concepts for building a Service Oriented distributed system. Simply put, when service A needs to call service B, it first needs to find a running instance of B. Static configurations become inappropriate in the context of an elastic, dynamic system, where service instances are provisioned and de-provisioned frequently (planned or unplanned) or network failures are frequent (Cloud). Finding an instance of B is not a trivial task anymore.

Discovery implies a mechanism where:

  • Services have no prior knowledge about the physical location of other Service Instances

  • Services advertise their existence and disappearance

  • Services are able to find instances of another Service based on advertised metadata

  • Instance failures are detected and they become invalid discovery results

  • Service Discovery is not a single point of failure by itself
Eureka Overview

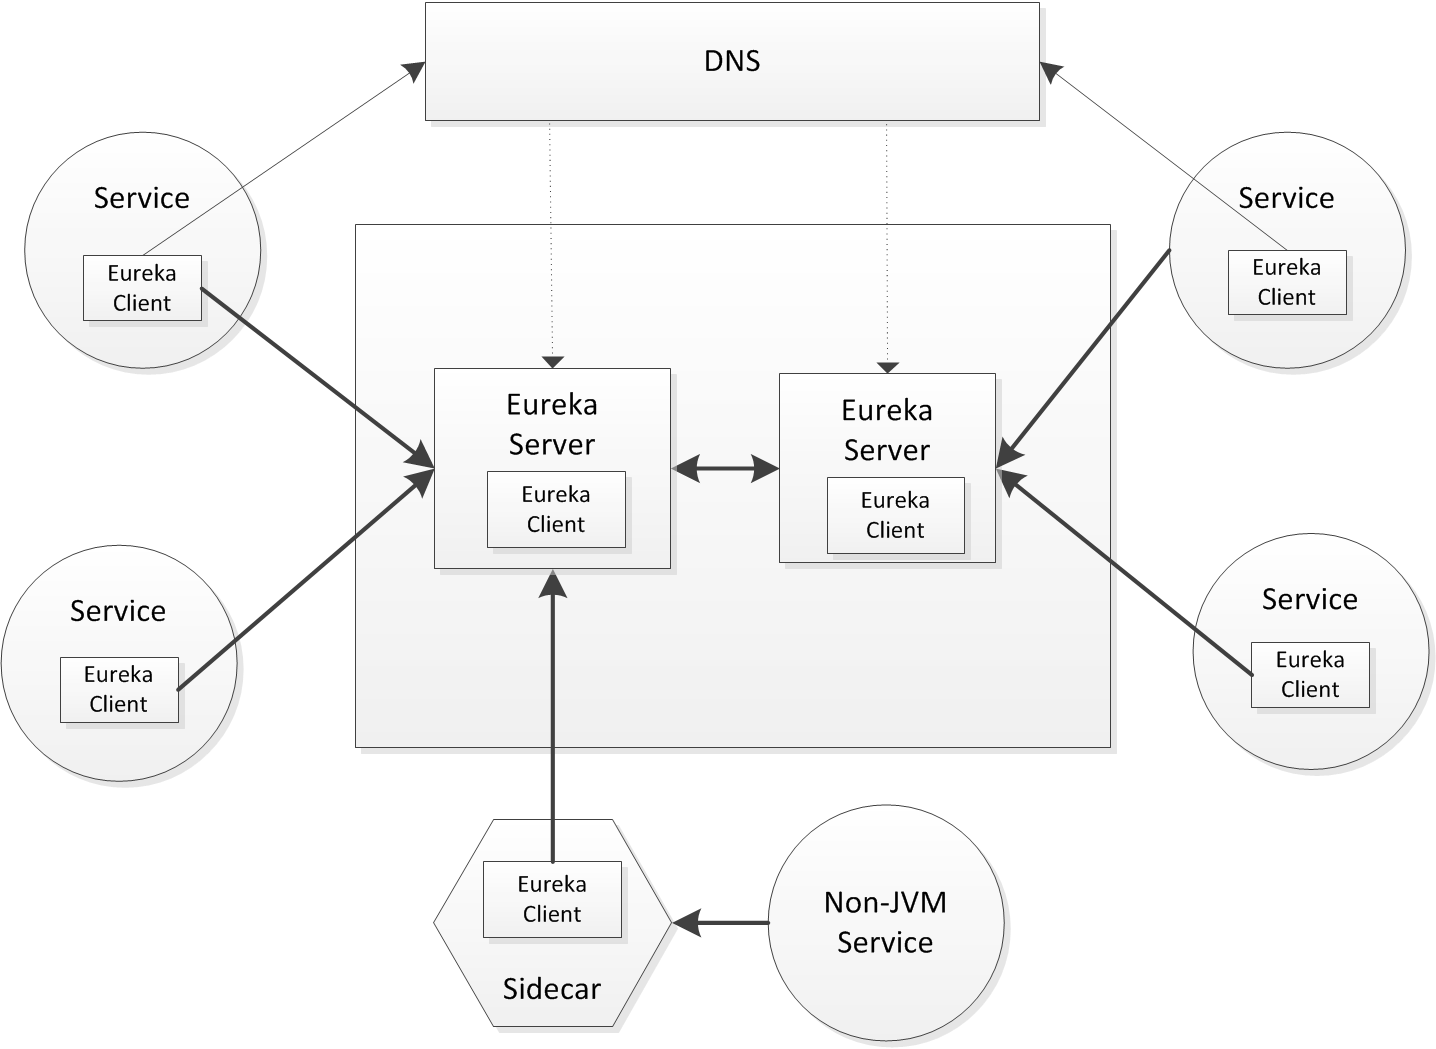
Netflix Eureka architecture consists of two components, the Server and the Client.

The Server is a standalone application and is responsible for:

  • managing a registry of Service Instances,

  • provide means to register, de-register and query Instances with the registry,

  • registry propagation to other Eureka Instances (Servers or Clients).

The Client is part of the Service Instance ecosystem and has responsibilities like:

  • register and unregister a Service Instance with Eureka Server,

  • keep alive the connection with Eureka Server,

  • retrieve and cache discovery information from the Eureka Server.

Discovery units

Eureka has notion of Applications (Services) and Instances of these Applications.

The query unit is the application/service identifier and the results are instances of that application that are present in the discovery registry.

High Availability

Netflix Eureka is built for High Availability. In CAP Theorem terms, it favours Availability over Consistency.

The focus is on ensuring Services can find each other in unplanned scenarios like network partitions or Server crashes.

High Availability is achieved at two levels:

  • Server Cluster - The production setup includes a cluster of Eureka Servers,

  • Client Side Caching.

Clients retrieve and cache the registry information from the Eureka Server. In case all Servers crash, the Client still holds the last healthy snapshot of the registry.
Terminology

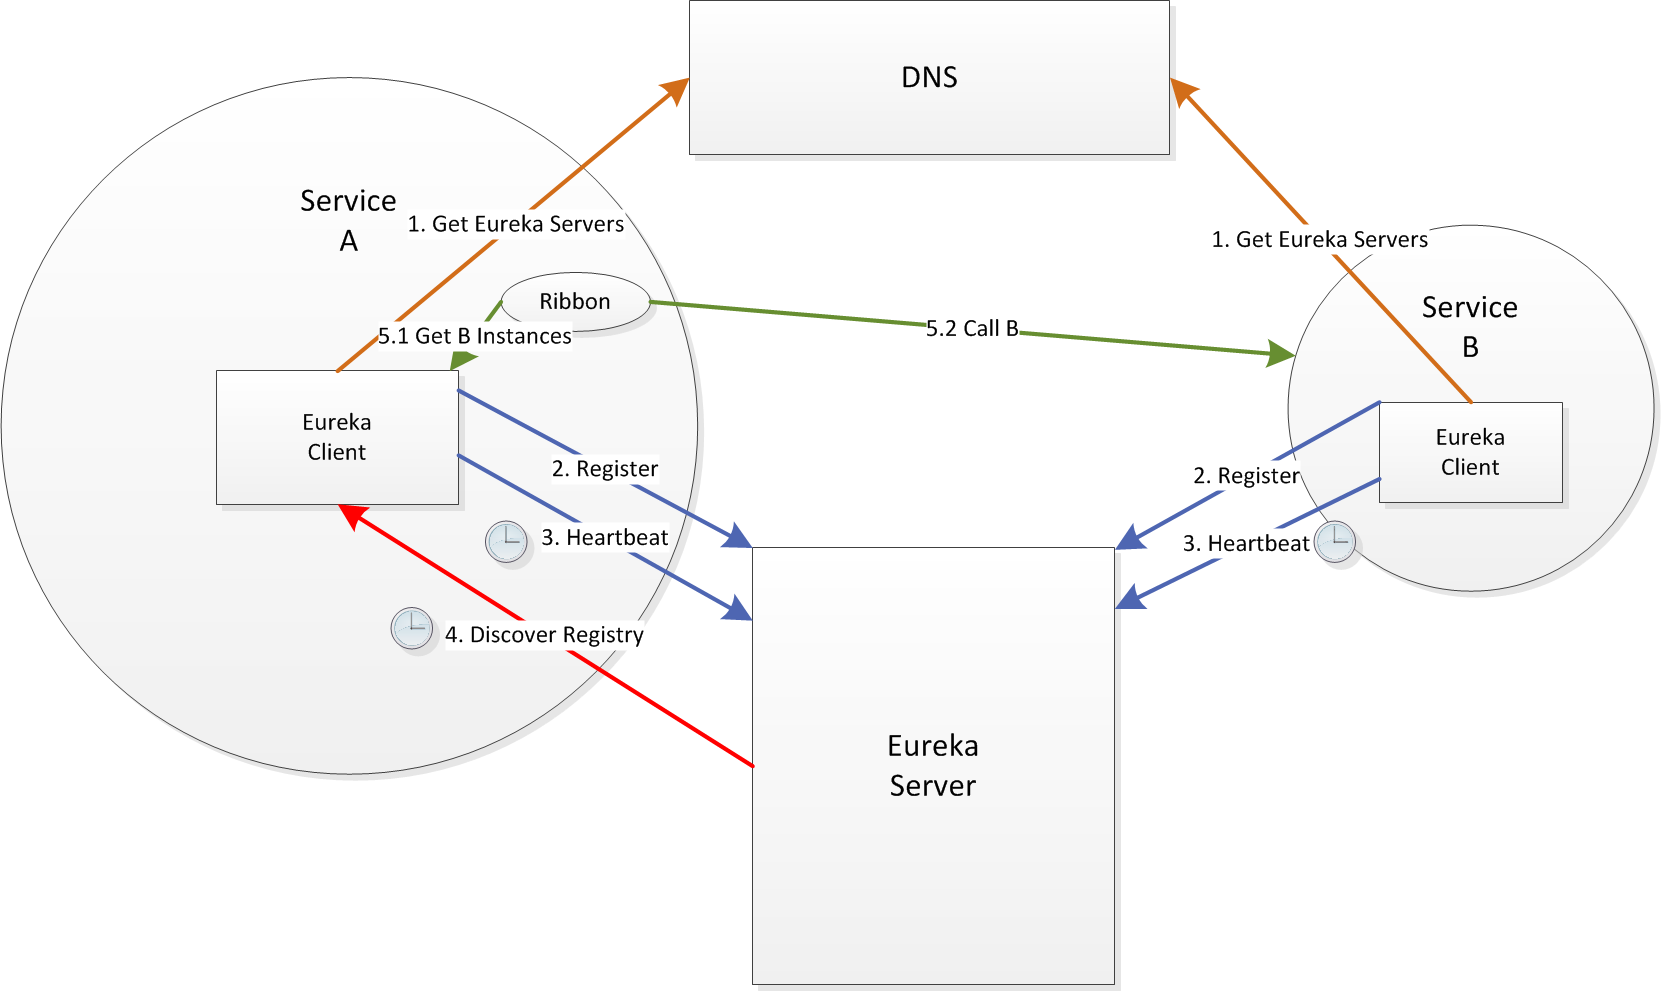
Eureka was built to work with Amazon Web Services (AWS). Therefore the terminology has references to AWS specific terms like regions, zones, etc. The examples presented in the article use the default region us-east-1 and the defaultZone.

Eureka Server

The Server is the actual Discovery Service in your typical SOA system. Start by cloning the Spring Cloud Eureka Sample github.com repository.

Standalone setup

It is easy to start an Eureka Server with Spring Cloud.

Any Spring Boot application becomes an Eureka Server by using the annotation `\@EnableEurekaServer`. Use the setup below for the local development machine.

Sample Eureka Server application:

@SpringBootApplication  @EnableEurekaServer   @EnableDiscoveryClient  public class EurekaApplication {    public static void main(String[] args) {    SpringApplication.run(EurekaApplication.class, args);      }  }    

Configuration yml:

server:    port: 8761  security:    user:      password: ${eureka.password}   eureka:       password: ${SECURITY_USER_PASSWORD:password}    server:      waitTimeInMsWhenSyncEmpty: 0      enableSelfPreservation: false    client:          preferSameZoneEureka: false   ---  spring:    profiles: devlocal  eureka:    instance:      hostname: localhost    client:      registerWithEureka: false      fetchRegistry: false       serviceUrl:        defaultZone: http://user:${eureka.password:${SECURITY_USER_PASSWORD:password}}@localhost:8761/eureka/

Start the application using the following Spring Boot Maven target:

mvn spring-boot:run -Drun.jvmArguments="-Dspring.profiles.active=devlocal"

The settings registerWithEureka and fetchRegistry are set to false, meaning that this Server is not part of a cluster.

Cluster setup

Eureka Servers are deployed in a cluster to avoid a single point of failure as a set of replica peers. They exchange discovery registries striving for Consistency. Clients don't need Server affinity and can transparently connect to another one in case of failure.

Eureka Servers need to be pointed to other Server instances.

There are different ways to do this, described below.

DNS

Netflix uses DNS configuration for managing the Eureka Server list dynamically, without affecting applications that use Eureka. This is the recommended production setup. Let's have an example with two Eureka Servers in a cluster, dsc01 and dsc02.

You can use Bind or other DNS server. Here are good instructions for Bind.

DNS configuration:

$TTL 604800  @ IN  SOA ns.eureka.local. hostmaster.eureka.local. (               1024       ; Serial               604800     ; Refresh                86400     ; Retry              2419200     ; Expire               604800 )   ; Negative Cache TTL  ;  @ IN  NS  ns.eureka.local.  ns IN A 10.111.42.10  txt.us-east-1 IN TXT "defaultZone.eureka.local"  txt.defaultZone IN TXT "dsc01" "dsc02"  ;

Application configuration:

eureka:    client:      registerWithEureka: true      fetchRegistry: true      useDnsForFetchingServiceUrls: true      eurekaServerDNSName: eureka.local      eurekaServerPort: 8761      eurekaServerURLContext: eureka

Static servers list

Configuration for the above cluster:

eureka:    client:      registerWithEureka: true      fetchRegistry: true      serviceUrl:        defaultZone: http://dsc01:8761/eureka/,http://dsc02:8762/eureka/ 

This is handy when running without DNS, but any change to the list requires a restart.

Multiple Servers on a single machine

Care is required when starting multiple Servers on the same machine. They need to be configured with different hostnames, different ports do not suffice. These hostnames must resolve to localhost. A way to do this is to edit the hosts file in Windows.

eureka:  instance:  hostname: server1
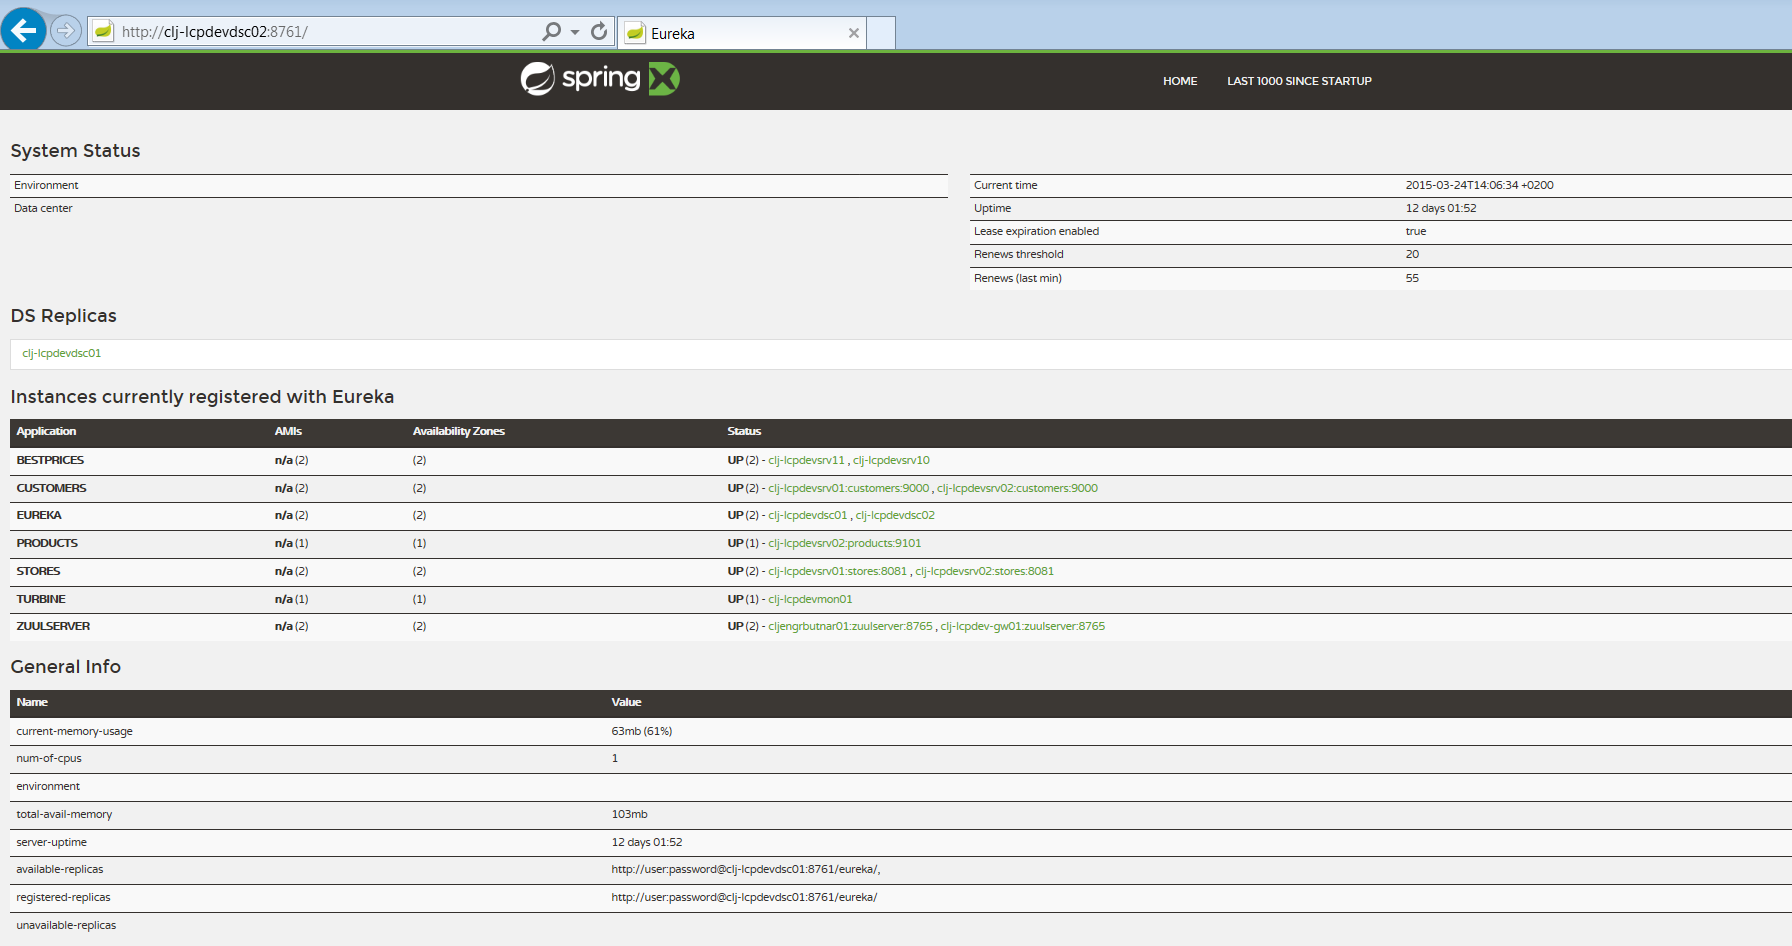
[Eureka Dashboard] Eureka Dashboard

Graphic Web Interface

Eureka offers a web dashboard where the status of the Server can be observed. We have a sample application environment where we assess technologies.

We initially started with the Spring Cloud samples and modified them based on our needs.

The example below is an Eureka Server from our sample application environment:

  • Discovery Server (DS) Replicas: the list of the other Servers in the cluster

  • Instances currently registered with Eureka: all the services and their instances that are registered with Eureka

  • Registered, Available and Unavailable replicas

XML/Text Web interface

More details can be retrieved in a text based interface:

<?xml version="1.0"?>    -<applications>    <versions__delta>1    </versions__delta>    <apps__hashcode>UP_11_    </apps__hashcode>     +<application>     +<application>     +<application>     -<application>                          <name>BESTPRICES</name>                   +<instance>                   -<instance>                       <hostName>clj-lcpdevsrv10       </hostName>                        <app>BESTPRICES</app>                        <ipAddr>10.111.42.71</ipAddr>                        <status>UP</status>                        <overriddenstatus>UNKNOWN        </overriddenstatus>                        <port enabled="true">8000</port>                  <securePort enabled="true">443  </securePort>                  <countryId>1</countryId>                                             <dataCenterInfo class="com.netflix.appinfo.InstanceInfo$DefaultDataCenterInfo">                   <name>MyOwn</name>                   </dataCenterInfo>                                   -<leaseInfo>                    <renewalIntervalInSecs>30    </renewalIntervalInSecs>                    <durationInSecs>90</durationInSecs>                  <registrationTimestamp>     1426271956166   </registrationTimestamp>                  <lastRenewalTimestamp>      1427199350993  </lastRenewalTimestamp>                  <evictionTimestamp>0</evictionTimestamp>                  <serviceUpTimestamp>1426157045251  </serviceUpTimestamp>                  </leaseInfo>                    <metadata class="java.util.Collections$EmptyMap"/>                    <appGroupName> MYSIDECARGROUP</appGroupName>                    <homePageUrl>http://clj-lcpdevsrv10:8000/    </homePageUrl>                    <statusPageUrl>http://clj-lcpdevsrv10:8001/info  </statusPageUrl>                  <healthCheckUrl>http://clj-lcpdevsrv10:8001/health  </healthCheckUrl>                  <vipAddress>bestprices</vipAddress>                  <isCoordinatingDiscoveryServer>false  </isCoordinatingDiscoveryServer>                  <lastUpdatedTimestamp>1426271956166  </lastUpdatedTimestamp>                  <lastDirtyTimestamp>1426271939882  </lastDirtyTimestamp>                  <actionType>ADDED</actionType>               </instance>          </application>                  +<application>  +<application>  +<application>  </applications>

Instance info

The element "instance" above holds full details about a registered Service Instance.

Most of the details are self explanatory and hold information about the physical location of the Instance, lease information and other metadata. HealthCheck urls can be used by external monitoring tools.

Custom metadata can be added to the instance information and consumed by other parties.

Eureka Client

The Client lives within the Service Instance ecosystem. It can be used as embedded with the Service or as a sidecar process. Netflix advise the embedded use for Java based services and sidecar use for Non-JVM.

The Client has to be configured with a list of Servers. The configurations above, DNS and static list, apply for the Client too, since the Servers use the Client to communicate with each-other.

Any Spring Boot application becomes an Eureka Client by using the annotation "@EnableDiscoveryClient" and making sure Eureka is in the classpath:

@SpringBootApplication  @EnableDiscoveryClient  public class SampleEurekaClientApp extends RepositoryRestMvcConfiguration {        public static void main(String[] args) {          SpringApplication.run(CustomerApp.class, args);      }  }  

Heartbeats

The Client and the Server implement a heartbeat protocol. The Client must send regular heartbeats to the Server. The Server expects these heartbeat messages in order to keep the instance in the registry and to update the instance info, otherwise the instance is removed from the registry. The time frames are configurable.

The heartbeats can also specify a status of the Service Instance: UP, DOWN, OUT_OF_SERVICE, with immediate consequences on the discovery query results.

Server self preservation mode

Eureka Server has a protection feature: in case a certain number of Instances fail to send heartbeats in a determined time interval, the Server will not remove them from the registry. It considers that a network partition occurred and will wait for these Instances to come back. This feature is very useful in Cloud deploys and can be turned off for collocated Services in a private data center.

Client Side Caching

One of the best Eureka features is Client Side Caching. The Client pulls regularly discovery information from the registry and caches it locally. It basically has the same view on the system as the Server. In case all Servers go down or the Client is isolated from the Server by a network partition, it can still behave properly until its cache becomes obsolete.

The caching improves performance since there is no more round-trip to a another location at moment the request to another service is created.

Usage

Eureka Discovery Client can be used directly or through other libraries that integrate with Eureka.

Here are the options on how we can call our sample Service bestprices, based on information provided by Eureka:

Direct

 ...  @Autowired  private DiscoveryClient discoveryClient;  ...    private BestPrice findBestPriceWithEurekaclient(final String productSku) {     BestPrice bestPrice = null;   // get hold of a service instance from Eureka   ServiceInstance instance = null;   // "bestprices" is the name of the service in Eureka   List instances = discoveryClient      .getInstances("bestprices");   if (instances != null && instances.size() > 0) {   instance = instances.get(0); //could be random   // Invoke server based on host and port.    // Example using RestTemplate.       URI productUri = URI.create(String     .format("http://%s:%s/bestprices/" + productSku,      instance.getHost(), instance.getPort()));     bestPrice = restTemplate.getForObject(productUri,      BestPrice.class);               }    return bestPrice;          }   

Ribbon Load Balancer

Ribbon is a HTTP client and software load balancer from Netflix that integrates nicely with Eureka:

...   @Autowired    private LoadBalancerClient loadBalancerClient;  ...    private BestPrice findBestPriceWithLoadBalancerClient(final String productSku) {   BestPrice bestPrice = null;     // "bestprices" is the name of the service in    // Eureka, as well as of the Ribbon LoadBalancer    // which gets created automatically.    ServiceInstance instance = loadBalancerClient    .choose("bestprices");      if (instance != null) {    // Invoke server, based on host and port.     // Example using RestTemplate.    URI productUri = URI.create(String      .format("http://%s:%s/bestprices/" + productSku,        instance.getHost(), instance.getPort()));       bestPrice = restTemplate.getForObject(productUri,     BestPrice.class);     }        return bestPrice;  }

Non-JVM Service integration

This aspect is not extensively covered and may be the topic for another article.

There are two approaches:
  • REST API - Eureka exposes a RESt API any application can interact with it. The down side is that all the other Netflix tools that integrate with Eureka would need an in-house counterpart implemented in the chosen programming language.

  • Sidecar - The sidecar is a process running side-by-side with the main Service Instance process. The host process will use its sidecar to retrieve information about other services, load balancing, etc., and the sidecar process will take care of the Client - Server protocols.