Search Posts on Binpipe Blog

Uncompress .xz Compressed Files

Use 'tar' command to uncompress .xz compressed files

tar xvfJ filename.tar.xz

But remember, .xz formats are supported only from tar 1.22 version.

If you have a lower version of tar like me, then either you can update your tar command or download xz utilities. To update the tar command, type as shown below:

yum update tar

Note: In case, if "yum update" didn't work for you, then you may download "tar" source and compile it. 

Use 'XZ' utils to un-compress .xz files

$wget http://tukaani.org/xz/xz-5.0.5.tar.gz  $cd xz-5.0.5  $./configure  $make  $sudo make install

Once the package is installed, run the below command to uncompress .xz file formats.

xz -d filename.tar.xz

Common Linux Server Issues & Solution

Scenario:1 On one of my Production SuSE Linux (VMware Virtual Server ) , Storage team has extended partition (RDM disk ) from their end. Now how to rescan that partition and extend without rebooting from the Linux ?
Solution : In My case 8th disk on Controller-1 was extended by the Storage Team.So first rescan it. Using the below Command :
[root@binpipe ~]# echo 1 > /sys/class/scsi_device/device/rescan
In the above command replace the device info according to your setup.
[root@binpipe ~]# echo "1" > /sys/class/scsi_device/0\:0\:8\:0/device/rescan
Now resize the PV using the pvresize Command.
[root@binpipe ~]# pvresize /dev/dm-7
Check the size of Volume Group using vgs command and it should display the new extended size. Using lvextend command we can now easily extend or increase the size of lvm partition.
Scenario:2 On one of my Linux Server, Oracle database was not running because of tmpfs . Oracle Team wants to extend the tmfs file system size from 2 GB to 4GB.
Solution: tmpfs is a RAM based temporary file system which is generally mounted on /dev/shm. To to extend the tmfs file system use below steps :
Step:1 Check tmfs file system size.
[root@binpipe ~]# df -h /dev/shm/
Filesystem Size Used Avail Use% Mounted on
tmpfs      2.0G 148K 2.0G   1% /dev/shm
[root@binpipe ~]#
Step:2 Edit the /etc/fstab file.
Change the size as shown below :
tmpfs /dev/shm tmpfs size=4g 0 0
Step:3 remount the file system using mount command
[root@binpipe ~]# mount -o remount tmpfs
Step:4 Now check the tmfs file system
[root@binpipe ~]# df -h /dev/shm/
Filesystem Size Used Avail Use% Mounted on
tmpfs       4.0G 148K 4.0G  1% /dev/shm
[root@binpipe ~]#
Scenario:3 How to check which disks are used for Oracle ASM in Linux ?
Solution : To display the Oracle ASM disk, use below command :
root@binpipe:~# oracleasm listdisks
To Query a particular disk, use below command
root@binpipe:~# oracleasm querydisk -d /dev/sdq1
Scenario:4 In one of my Linux box , NAS share was mounted on the directory under /archive2015. Space of the NAS share was 150 GB and used size is 137 GB but when we try to create any file or directory we were getting “Disk Quota Exceed” error.
Solution: As it was NAS file system so from the OS perspective we can’t set quota on this. So in my case i contact to Storage team , ask them to check quota limit ( soft quota & Hard quota ). From the Storage Team we got the confirmation that quota limit is set ( Soft quota = 85 % & Hard Quota = 100 % ) and Grace period of 7 Days is also set.
So in our case soft quota limit was reached and no one has reduce the space utilization for 7 Days, so on 8th day Soft Quota limit becomes Hard Quota that’s why we are getting Disk Quota exceed error.
Scenario:5 For same file system df and du command shows different disk usage.
Solution: This could be because of open file deletion, i.e when someone delete a log file that is being used or open by other process if we try to delete this file then file name will be deleted buts it’s inode and data will not be deleted.
with the help “lsof” command we can determine the deleted files of /var that are still open :
$ lsof /var | egrep "^COMMAND|deleted"
So to release the space , we can kill the command with its PID using kill command.

PASSWORDLESS SSH LOGIN WITH 'SSHPASS' (WITHOUT SSH KEYS)

Compile and Install SSHPASS

1. Download the latest SSHPASS package from
http://sourceforge.net/projects/sshpass

2. Extract the package to a directory.

3. Run the following commands to compile SSHPASS:

# ./configure
# make
# make install
# make clean

4. Installation is complete.

Login to ssh server called server.example.com with password called t@uyM59bQ:
# sshpass -p 'p@ssword' ssh username@server.test.com

Under shell script you may need to disable host key checking:
# sshpass -p 'p@ssword' ssh -o StrictHostKeyChecking=no username@server.test.com

MYSQL 'Already has more than max_user_connections' & 'Cannot send session cache limiter' Issue & Solution

MYSQL 'Already has more than max_user_connections' & 'Cannot send session cache limiter' Issue & Solution is discussed below. Hope this helps.


ISSUE:
Warning: mysqli_real_connect(): (42000/1203): User sphn_vtig1 already has more than 'max_user_connections' active connections in /home/sphn/public_html/vt_vb/libraries/adodb/drivers/adodb-mysqli.inc.php on line 123

SOLUTION:

Solution could be any of the following:

1.  Use separate DB user to connect to vtiger and to connect the script that imports data every few minutes. This way each user will use its own connection limit.  Also, check that the connection is closed by the script after it inserts data. If not close it otherwise it will open too many connections till the timeout value is reached.


2. Try the following if you have root access to the server, or let me know. You can call me anytime if any help is needed.

The option max_user_connections is a limit imposed, not on the total number of simultaneous connections in the server instance, but on the individual user account.

Let's say the user is called db_user@localhost. You can find out what this user's connection limit is. Start by running this query:

SELECT max_user_connections FROM mysql.user
WHERE user='db_user' AND host='localhost';
If this is a nonzero value,change it back with

GRANT USAGE ON *.* TO db_user@localhost MAX_USER_CONNECTIONS 0;
or

UPDATE mysql.user SET max_user_connections = 0
WHERE user='db_user' AND host='localhost';
FLUSH PRIVILEGES;

This will cause mysqld to allow the user db_user@localhost to use the global setting max_user_connections as its limit.

Once you get to this point, now check the global setting using

SHOW VARIABLES LIKE 'max_user_connections';

If this is a nonzero value, you need to do two things

THING #1 : Look for the setting in /etc/my.cnf

[mysqld]
max_user_connections = <some number>
comment that line out

THING #2 : Set the value dynamically

SET GLOBAL max_user_connections = 0;

MySQL restart is not required.


ISSUE
Warning: session_start(): Cannot send session cache limiter - headers already sent (output started at /home/sphn/public_html/vt_vb/libraries/adodb/drivers/adodb-mysqli.inc.php:123) in /home/sphn/public_html/vt_vb/libraries/HTTP_Session/Session.php on line 161

SOLUTION:

"Headers already sent" means that your PHP script already sent the HTTP headers, and as such it can't make modifications to them now.

Just make session_start the first thing you do in your PHP file. 
Put <?php session_start(); ?> above everything and it will work.

Creating Offline RPM Repository in Redhat & CentOS Linux

Redhat / CentOS flavours of Linux use YUM to manage software updates and package installers. Here are the steps to create a local offline repository for installation.

Creating RPM Repository in Local Server

1. Insert your Red hat DVD installer inside DVD ROM.
2. Mount the DVD by
[root@localhost ~]#mounts /dev/cdrom /media
3. Create a folder of your choice. In my case I have created /home/rpms
4. Copy all the RPM from /media/Server/ to /hom/rpms folder
[root@localhost ~]#mkdir /home/rpms  [root@localhost ~]#cp -rv /media/Server/*  /home/rpms
6. Now look for a folder /etc/yum.repos.d. If the directory exists then YUM package is already installed and you can skip this step. So you just need to configure. If it is not there you have to install yum and yum-utils package. Also install one RPM called createrepo.
[root@localhost rpms]# cd /media/Server/  
[root@localhost Server]# rpm -ivh yum-3.0.1-5.el5.noarch.rpm  
[root@localhost Server]# rpm –ivh yum-utils-1.0.4-3.el5.noarch.rpm  
[root@localhost Server]# rpm -ivh createrepo-0.4.4-2.fc6.noarch.rpm
7. Once YUM packages are installed you will get the /etc/yum.repos.d folder. Go inside the folder and open the entire .repo file present inside that folder. In all .repo file search for
enabled = 1
and replace by
enabled = 0
This means you are disabling the default repository locations or else you can delete all repo files.
8. Edit the /etc/yum.conf file,change the following line:

keepcache=0 to keepcache=1
9. Now prepare the directory /rpms to act as a repository. For this we run the command
[root@localhost ~]createrepo -p /rpms 
This command will take some time to finish and once finished you can see a directory called repodata will be created inside the /rpms directory.
11.If some error comes like "Cannot delete .olddata" Then you have to remove it manually by "rm -rf /home/rpms/.olddata"
yum error 39
10. Now create a file myrepo.repo inside /etc/yum.repos.d folder
[root@localhost ~]touch /etc/yum.repos.d/myrepo.repo
11. Put the following contents inside the myrepo.repo file
[myrepo]   name=My Local Repo   baseurl=file:///home/rpms   enabled=1   gpgcheck=0
Save the file and exit.
Now your repository is ready. Before running any installation first clean the cache by
Yum clean all
Now you can install anything like
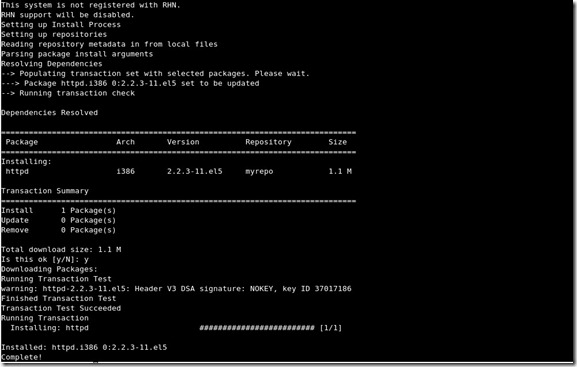
[root@localhost ~]yum install httpd
You will get a screen like below where you have to say "y" or "n"
yum installation
N:B-Here I have used file:// protocol as base url.You can use ftp:/// or http:// if you have remote repository location.

Common Errors and their solutions

1)Errno 256:Metadata file does not match checksum
Solution:
1) Edit /etc/yum.conf and add the following line
http_caching=packages
2) Run "yum clean metadata"
3) Retry the yum install
2)"TypeError: rpmdb open failed" or "TypeError: rpmdb unable to join the environment"
Solution:
# yum clean all  
#rm -f /var/lib/rpm/__db*  
#rpm –rebuilddb  
#yum update
3)ValueError: need more than 1 value to unpack
Solution:
#yum clean all

#yum clean metadata
#yum clean dbcache

and then execute
#yum makecache
4)thread.error: can't start new thread
Solution:
#rm /usr/lib/yum-plugins/ threading.py
#yum update
5)[Errno -3] Error performing checksum
Solution:
#createrepo -v -s sha1 <repository location>
#yum clean all
6)TypeError: unsubscriptable object
Solution:
#yum clean metadata
#yum update missing dependency error
Solution:
#yum clean all
#yum update
7)Yum install GPG error
Solution:
#rpm --import /etc/pki/rpm-gpg/RPM*
8)Error: Cannot retrieve repository metadata (repomd.xml)
Solution:
This is a network issue.Please check DNS,Proxy etc. settings for the same.

ORACLE DATABASE DUMP USING EXPORT

To take the full database export (Oracle 10g):

Create a Export Directory:
##########################

On Solaris:
-----------
SQL> create or replace directory sys_dmp as '/u02/expdp';
Directory created.

On Windows:
-----------
SQL> create or replace directory sys_dmp as 'D:\expdp';
Directory created.

Create a separate export user:
##############################

SQL> Connect /as sysdba

SQL> CREATE USER expdpadmin IDENTIFIED BY expdp default tablespace users;
User created.

Grant Export and Import Privileges.
###################################

SQL> GRANT CONNECT,RESOURCE TO expdpadmin;
Grant succeeded.

SQL> GRANT exp_full_database to expdpadmin;
Grant succeeded.

SQL> alter user expdpadmin quota unlimited on USERS;
User altered.

SQL> GRANT READ, WRITE ON DIRECTORY SYS_DMP to expdpadmin;
Grant succeeded.

To check on which directories you have privilege to read & write:
#################################################################

SQL> SELECT privilege, directory_name
2 FROM user_tab_privs t, all_directories d
3 WHERE t.table_name(+)=d.directory_name
4 ORDER BY 2,1;

Exporting Full Database:
########################

expdp expdpadmin/XXXXXX full=y directory=sys_dmp dumpfile=full_db_expdp.dmp logfile=full_db_expdp.log
Simple Steps: how to perform a full database export using export utility.

* Use either system user or any other database user who has the EXP_FULL_DATABASE privilege.
* Set the NLS_LANG environment variable according the database character set and language details.
SQL> select * from nls_database_parameters
2 where parameter in ('NLS_LANGUAGE','NLS_TERRITORY','NLS_CHARACTERSET');

PARAMETER VALUE
------------------------------ ----------------------------
NLS_LANGUAGE AMERICAN
NLS_TERRITORY AMERICA
NLS_CHARACTERSET WE8ISO8859P1

Windows (Dos Prompt):
C:\> set NLS_LANG=AMERICAN_AMERICA.WE8ISO8859P1

Unix/Linux:
$ export NLS_LANG=AMERICAN_AMERICA.WE8ISO8859P1

* Start the export with following command and options.

exp system/password@mydbfile=c:\exportdmp\exp_fulldb_MYDB_27Aug08.dmp
full=y log= c:\exportdmp\exp_fulldb_MYDB_27Aug08.log

Note: This is just a simple export command to perform the full database export. I would request and suggest you to refer Oracle Documentations on export/import and their options. Check the references.

Help on Export and Import:

Windows:
C:\> exp help=y
C:\> imp help=y

Linux/Unix.
$ exp help=y
$ imp help=y

References:

Oracle 10g :
http://download.oracle.com/docs/cd/B19306_01/server.102/b14215/exp_imp.htm

Oracle 9i:
http://download.oracle.com/docs/cd/B10501_01/server.920/a96652/part1.htm#435787

Oracle 8i:
http://download-west.oracle.com/docs/cd/A87860_01/doc/server.817/a76955/ch01.htm
http://download-west.oracle.com/docs/cd/A87860_01/doc/server.817/a76955/ch02.htm
SHELL SCRIPT FOR DB EXPORT
#!/bin/bash
ORACLE_BASE="/user/oracle"
PATH="$PATH:$ORACLE_HOME/bin:$JAVA_HOME/bin"
ORACLE_HOME=$ORACLE_BASE/OraHome
ORACLE_SID=PLMDPRD
PATH="$PATH:$ORACLE_HOME/bin:$JAVA_HOME/bin"
export PATH
export LD_LIBRARY_PATH="$ORACLE_HOME/lib"
export ORACLE_SID=PLMDPRD
dt=`/bin/date +%d%m%y%H%M%S`
exportfile="/user/oracle/PLMDPRD/PLMDPRD_${dt}".dmp
#exp / full=Y file=$exportfile  buffer=512000 compress=N   statistics=none
exp user/password@PLMDPRD   buffer=512000 compress=N  file=$exportfile statistics=none GRANTS=Y  full=Y
exit 0

CLONE ORACLE DATABASE FOR PLM

1. Stop the Oracle Database in source server


~oracle-user$ sqlplus '/as sysdba'

SQL> shutdown abort;
ORACLE instance shut down.

~oracle-user$ lsnrctl stop


2. Copy or Rsync the /user/oracle directory to destination server
Also copy the /misc directory if log files are archived there


3. Once done enter the Destination server as oracle user then run the
following:


~oracle-user$ sqlplus '/as sysdba'


SQL> startup mount;
ORACLE instance started.

Total System Global Area 1610612736 bytes
Fixed Size 2084296 bytes
Variable Size 385876536 bytes
Database Buffers 1207959552 bytes
Redo Buffers 14692352 bytes
Database mounted.


MEMBER
--------------------------------------------------------------------------------
/misc/oradata/PLMDPRD/redo/redo01.log

SQL> recover database until cancel using backup controlfile;
ORA-00279: change 265595845 generated at 02/01/2015 11:58:23 needed for thread1
ORA-00289: suggestion : /misc/oradata/PLMDPRD/arch/1_8626_731024280.dbf
ORA-00280: change 265595845 for thread 1 is in sequence #8626

Specify log: {<RET>=suggested | filename | AUTO | CANCEL}
/misc/oradata/PLMDPRD/redo/redo01.log
Log applied.
Media recovery complete.


SQL> shutdown abort;

SQL> startup;
ORACLE instance started.

Total System Global Area 1610612736 bytes
Fixed Size 2084296 bytes
Variable Size 385876536 bytes
Database Buffers 1207959552 bytes
Redo Buffers 14692352 bytes
Database mounted.
ORA-01589: must use RESETLOGS or NORESETLOGS option for database open


SQL> alter database open resetlogs;

Database altered.

SQL> shutdown abort;

SQL> startup;
ORACLE instance started.

Total System Global Area 1610612736 bytes
Fixed Size 2084296 bytes
Variable Size 385876536 bytes
Database Buffers 1207959552 bytes
Redo Buffers 14692352 bytes
Database mounted.
Database opened.


SQL>quit

Now startup oracle listner and use the database.