Search Posts on Binpipe Blog

Blue-Green Deployments with Terraform & Jenkins

DevOps methodologies and practices have transformed the complexities of IT infrastructure management into code that manages the entire IT infrastructure with little maintenance. We have a lot of configuration management tools, and orchestration tools to tailor our IT infrastructure-as-code, but selecting the right tool relies on numerous factors such as analyzing the pros and cons of the tools and understanding how it fits to our use case. They should ideally have no vendor lock-in, clear official documentation, good community support, easy integration with the platform, and be agnostic to different cloud providers and third party software.

Common Scenarios in IT Infrastructure Management

Provisioning and de-provisioning resources in a cloud environment is a common practice for testing and releasing a software product without any bugs. In conjunction with continuous integration and deployment tools, we may need to use both orchestration tools and configuration management tools as well. In any cloud environment, orchestration tools such as Terraform, CloudFormation, Heat, and AzureRM are responsible for provisioning infrastructure, and configuration management tools such as Chef, Ansible, Puppet, and Saltstack take care of installing the software packages in the server, configuring the services, and deploying the applications on top of it. But today, configuration management tools have to support, to some extent, provisioning resources in the cloud, and provisioning tools must support installing and configuring software on a newly created resource. It balances the complexity of provisioning and managing infrastructure. On the other hand, it is difficult to achieve everything with a single tool. The recommended way is to use both provisioning and configuration tools for managing infrastructure at scale.

Why Do We Need an Immutable Infrastructure?

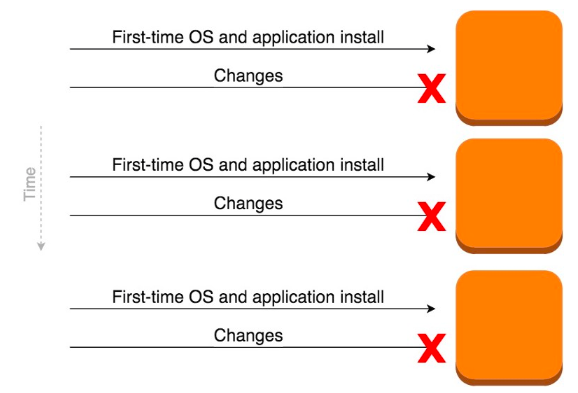
Even we are managing an infrastructure with configuration management tools, there is a chance of having configuration drift in the servers if there are frequent configuration changes applied on the server. In order to avoid this situation, we should not change the configuration of the running server by either modifying it manually or through configuration management tools. Maintaining an immutable infrastructure is the best practice to avoid configuration drift. Immutable infrastructure is now becoming a popular term across the DevOps community. It is a practice of provisioning a new server for every config changes and d-provisioning the old ones. Provisioning tools like Terraform and CloudFormation support creating an immutable infrastructure to a great extent. For every software configuration changes, it will create a new infrastructure and deploy the configuration then delete the old ones. It will not create any confusions when we are managing a large infrastructure. We do not need to worry about the configuration changes and their impact over a period of time. In a production environment, DevOps practitioners often follow Blue-Green deployment to avoid unexpected issues, which leads to downtime in a production environment. Rollback is possible here and an application can enter into the previous state without any difficulties because we did not make any changes to the existing environment. Terraform helps to create an immutable infrastructure.
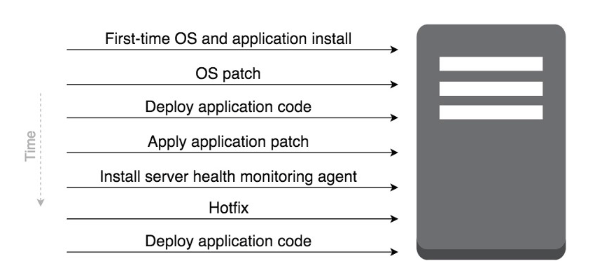
Image title

                                                            Fig. 1: Mutable Infrastructure


Image title

                                                            Fig. 2: Immutable Infrastructure


Infrastructure-as-Code

HashiCorp Terraform enables you to safely and predictably create, change, and improve infrastructure. It is an open-source tool that codifies APIs into declarative configuration files that can be shared amongst team members, treated as code, edited, reviewed, and versioned. Terraform supports storing the state of the infrastructure which helps us to prevent the configuration drift. We can store the state in the local environment or from remote key-value or object stores.
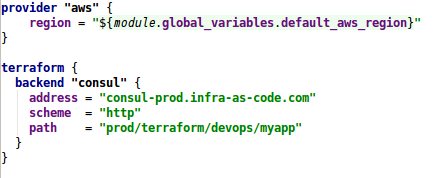
Terraform provider and backend configuration

                                                Fig. 3: Terraform provider and backend configuration

The syntax of Terraform configuration is called HashiCorp Configuration Language (HCL). Terraform can also support JSON configurations. It supports multiple providers for orchestration. The majority of code is written in GoLang. Terraform follows clear syntax to define the resources and it supports the most common data structures such as list, map, string to define the variables. It is quite simple to organize the code. We can read the credentials from the environment variables instead of defining it inside the Terraform configuration file.
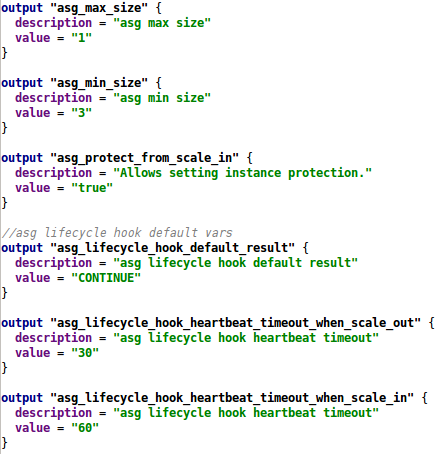
Image title

                                                                    Fig. 4: Terraform Variables

Many open-source IDEs support development environments for Terraform modules. We can extend the functionality of the Terraform by writing custom plugins and provisioners to run script from bash, Ruby, Chef, etc. Reusable Terraform modules for various providers are available in Terraform registry. Terraform enterprise offers a web interface to manage Terraform and its state.
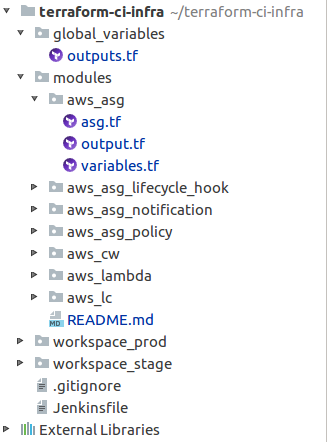
Image title

                                                             Fig. 5: Terraform Project Structure


Benefits of Using Terraform
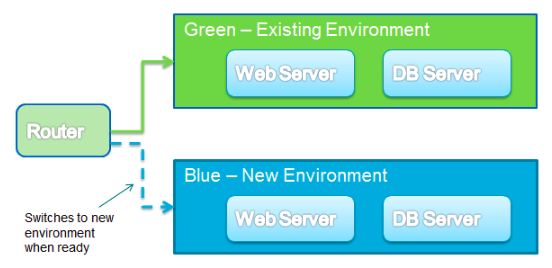
Image title

                                                               Fig. 6: Blue Green Deployment with Terraform

  1. Defines infrastructure-as-code to increase operator productivity and transparency.

  2. Terraform configuration can be stored in version control, shared, and collaborated on by teams of operators.

  3. Tracks the complete history of infrastructure versions. Terraform state can be stored in a local disk as well as any one of the supported remote backends such as AWS S3, OpenStack Swift, Azure Blob, Consul, etc.

  4. Terraform provides an elegant user experience for operators to safely and predictably make changes to infrastructure.

  5. Terraform builds a dependency graph from the configurations, and walks this graph to generate plans, refresh state, and more.

  6. Separates plans and reduces mistakes and uncertainty at scale. Plans show operators what would happen,  and it applies execute changes.

  7. Terraform can be used to create resources across all major infrastructure providers (AWS, GCP, Azure, OpenStack, VMware, and more) and third-party tools such as Github, Bitbucket, New Relic, Consul, and Docker.

  8. Terraform lets operators easily use the same configurations in multiple places to reduce mistakes and save time.

  9. We can use the same Terraform configuration to provision identical staging, QA, and production environments.

  10. Common Terraform configurations can be packaged as modules and used across teams and organizations.
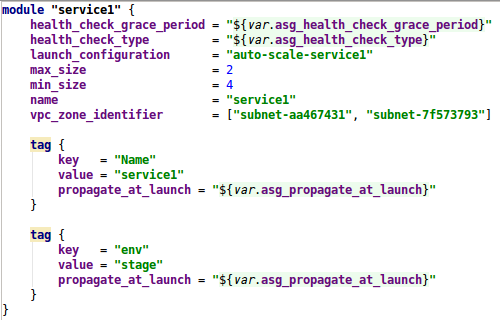
Image title

                                Fig. 7: Calling Terraform modules from the workspace


CI/CD Pipeline Workflow for Applying Changes to The Infrastructure Using Terraform
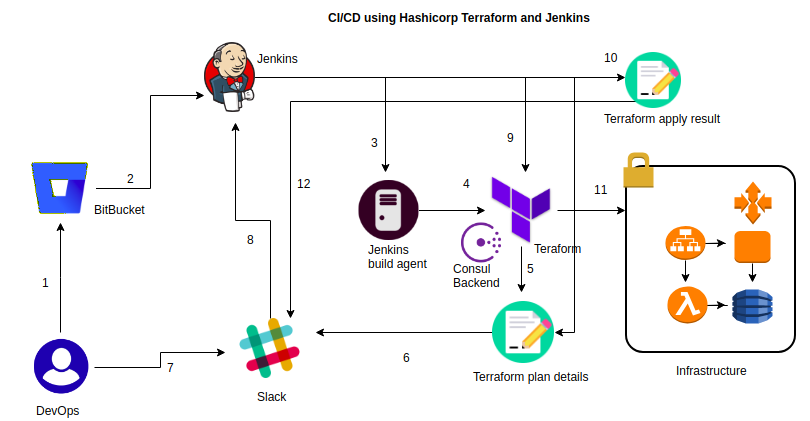
Image title

                                            Fig. 8: CI/Cd Pipeline for Terraform Using Jenkins

  1. The developer or operations engineer changes the Terraform configuration file in his local machine and commits the code to BitBucket.

  2. Gitbucket Webhook triggers a continuous integration job to Jenkins.

  3. Jenkins will pull the latest code from the configured repo which contains Terraform files to its workspace.

  4. It reads the Terraform configuration then initializes the remote consul backend.

  5. Terraform generates a plan about the changes that have to be applied on the infrastructure

  6. Jenkins sends a notification to a Slack channel about the changes for manual approval.

  7. Here, the user can approve or disapprove the Terraform plan.

  8. The user input is sent to Jenkins server for proceeding with the further action.

  9. Once the changes are approved by an operator, Jenkins will execute the terraform apply command to reflect the changes to the infrastructure.

  10. Terraform will create a report about the resources and its dependency created while executing the plan.

  11. Terraform will provision the resources in the provider environment.

  12. Jenkins will again send a notification to the Slack channel about the status of the infrastructure after the applying changes on it. Once the job is executed, Jenkins pipeline job is configured to clean up the workspace created by the job.


###Jenkinsfile###
import groovy.json.JsonOutput
//git env vars
env.git_branch = 'master'
env.credentials_id = '1'
//slack env vars
env.notification_channel = 'my-slack-channel'
//jenkins env vars
env.jenkins_server_url = 'https://52.79.46.98'
env.jenkins_node_custom_workspace_path = "/opt/bitnami/apps/jenkins/jenkins_home/${JOB_NAME}/workspace"
env.jenkins_node_label = 'master'
env.terraform_version = '0.11.10'
def notifySlack(text, channel, attachments) {
    def payload = JsonOutput.toJson([text: text,
        channel: channel,
        username: "Jenkins",
        attachments: attachments
    ])
    sh "export PATH=/opt/bitnami/common/bin:$PATH && curl -X POST --data-urlencode \'payload=${payload}\' ${slack_url}"
}
pipeline {
agent {
node {
customWorkspace "$jenkins_node_custom_workspace_path"
label "$jenkins_node_label"
} 
}
stages {
stage('fetch_latest_code') {
steps {
git branch: "$git_branch" ,
credentialsId: "$credentials_id" ,
url: "$git_url"
}
}
stage('install_deps') {
steps {
sh "sudo apt install wget zip python-pip -y"
sh "cd /tmp"
sh "unzip terraform.zip"
sh "sudo mv terraform /usr/bin"
sh "rm -rf terraform.zip"
}
}
stage('init_and_plan') {
steps {
sh "sudo terraform init $jenkins_node_custom_workspace_path/workspace"
sh "sudo terraform plan $jenkins_node_custom_workspace_path/workspace"
notifySlack("Build completed! Build logs from jenkins server $jenkins_server_url/jenkins/job/$JOB_NAME/$BUILD_NUMBER/console", notification_channel, [])
}
}
stage('approve') {
steps {
  notifySlack("Do you approve deployment? $jenkins_server_url/jenkins/job/$JOB_NAME", notification_channel, [])
input 'Do you approve deployment?'
}
}
stage('apply_changes') {
steps {
sh "echo 'yes' | sudo terraform apply $jenkins_node_custom_workspace_path/workspace"
notifySlack("Deployment logs from jenkins server $jenkins_server_url/jenkins/job/$JOB_NAME/$BUILD_NUMBER/console", notification_channel, [])
}
}
}
post { 
  always { 
    cleanWs()
   }
  }


How to Setup the Deployment Environment:

  1. Create a repo in SCM tools like Gitlab or BitBucket and commit the Terraform configuration and its dependency module to the repo. If you are using any third-party remote module as a dependency, it will be automatically downloaded while execution.

  2. If you do not have Jenkins server, then just pull a Jenkins Docker image and run it in your local machine. If you are setting it up in a cloud environment, check the Jenkins virtual machine image from the marketplace to set up the environment and configure the required plugins.

  3. Create a webhook in your BitBucket repo settings to invoke an HTTP call to your Jenkins callback URL for triggering continuous integration job.

  4. If you have an existing Jenkins server, ensure pipeline plugin is installed in the Jenkins server. Otherwise go to "Manage Plugins" and install the pipeline plugin.

  5. In this project, we are using consul as a remote backend for state storing and state locking. It is not recommended to use in the local state for the case where multiple people involved in the project and for production deployments. It is good to use remote backend which provides highly available storage with state lock functionalities to avoid writing the state by multiple users at a time.

  6. If you do not have consul key-value store in your environment, just pull consul Docker image and set up a single node cluster. If it is production deployment, set up a distributed key-value store.

  7. Create an application in Slack and note down the slack integration details for configuring it in Jenkinsfile.

  8. Configure your provider details and backend details in the main Terraform configuration file either by environment variable or persisting in a repo. In my case, I am going to provision a resource in AWS and my CI server is hosted in AWS. So I am assigning an IAM Role to my server with sufficient privileges.

  9. Create a new project in Jenkins by using pipeline plugin.

  10. Add the Jenkinsfile where the pipeline stages are defined. Save the job and trigger it manually for testing. Then apply changes to the configuration and commit the changes to the BitBucket and ensure the job is automatically triggered. Check Jenkins log for more details about the job.
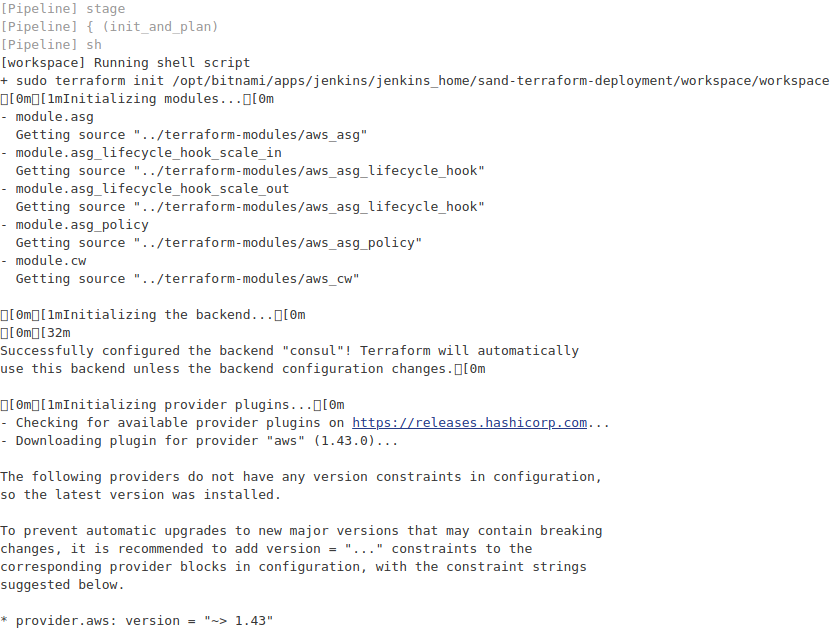
Image title

                                                                Fig. 9 Jenkins Log

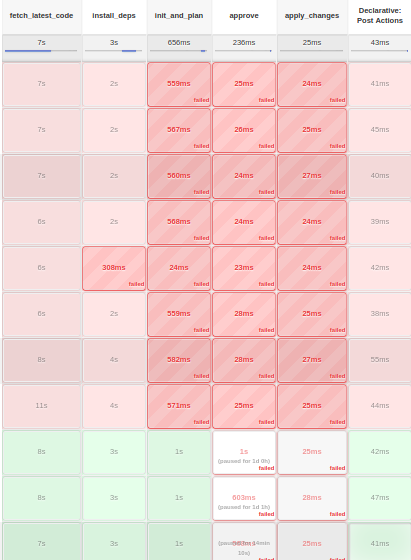
Image title

                                                                        Fig. 10: Build History

Container ≠ Docker

"The times are a changin' ..." - was relevant then, is relevant now!


Technology is evolving at bullet's pace, and the science of containers is turning on its head! Earlier "Containers" meant just one monolithic Docker daemon and basically everything in the container lifecycle was Docker. Right now it's pretty much the opposite.

This post is meant to catch-up on the new projects appearing on the container namespace like containerd, runc, kata containers, cri-o, rkt, how are they different to Docker? and where does Docker stand today?

To make things interesting, here's a timeline of the container space that I have come up with. Lets go through the milestones to see the history of the container evolution till the time Docker appeared in the scene. After going through this we will fallback to the original discussion about container runtimes apart from Docker. Here we go-

-> 1979 AD: 'chroot' system call was introduced in the Unix V7. That marks the beginning of process isolation and segregating file access for each process.

-> 2000 AD: FreeBSD-Jails created, these were used by small shared-environment hosting providers to achieve isolation and also had the option to assign an IP address for each system and configuration.

-> 2001 AD: Linux VServer, with capabilities similar to Jails but now embedded into the Linux kernel.

-> 2004 AD: The first public beta of Solaris Containers was released that combines system resource controls and boundary separation provided by zones

-> 2005 AD: OpenVZ an operating system-level virtualization technology for LinuopenVZ history of containersx which uses a patched Linux kernel for virtualization, isolation, resource management and checkpointing.

-> 2006-2007 AD: Google launched 'Process Containers' for limiting, accounting and isolating resource usage (CPU, memory, disk I/O, network) of a collection of processes. It was renamed "Control Groups (cgroups)" later and merged to Linux kernel 2.6.24.

-> 2008 AD: LXC the first and most complete implementation of Linux container manager was deployed using cgroups and Linux namespaces, and it works on a single Linux kernel without requiring any patches.

-> 2011 AD: Cloud Foundry created 'Warden', which could isolate environments on any operating system, running as a daemon and providing an API for container management.

-> 2013 AD: Let Me Contain That For You (LMCTFY)! Started as an open-source version of Google's container stack, providing Linux application containers. This later merged back to Google's libcontainer and is now a part of the Open Container Foundation.

-> 2014 AD: Enter "Docker". With Docker, containers exploded in popularity. It's no coincidence the growth of docker history of containersDocker and container use goes hand-in-hand.
Similar to Warden, Docker also used LXC in its initial stages and later replaced that container manager with its own library, libcontainer. But there's no doubt that Docker separated itself from the pack by offering an entire ecosystem for container management.  

So our story for today begins post 2014. Where container meant just Docker and its adoption grew in leaps and bounds. The advent of container orchestrators/Frameworks like Apache Mesos, Marathon & Kubernetes made deployments robust. By 2016, the container space was sky-rocketing and docker decided to split the monolith into separate parts, some of which other projects can even build on — that's how containerd happened. That was Docker v1.11.

Containerd is a daemon that acts as API facade for various container runtimes and OS. When using containerd, you no longer work with syscalls, instead you work with higher-level entities like snapshot and container — the rest is abstracted away. If you want to understand containerd even more in depth, there's a design documentation in their GitHub repo - https://github.com/containerd/containerd

Under the hood, containerd uses runc to do all the linux work.

What's not seem to be discussed that much is that with Docker 1.11 another separate component is containerd-shim. This is the parent process of every container started and it also allows daemon-less containers (so e.g. upgrading docker daemon without restarting all your containers, which was a big pain, yay!).

So what is actually Docker nowadays? Docker still provides nice end-to-end experience when it comes to containers especially for developers. Docker consists of several components — the one we are most familiar with is the proprietary and user facing is dockerd

Dockerd is the thing that helps you work with volumes, networking or even orchestration. And of course it can launch containers or manage images as well, but containerd is listening on linux socket and this is just translated to calls to its GRPC API. This is a very good post that sums up various moving parts of Docker today.

Unfortunately that's not the end of the story. There's still many projects that we haven't even touched. Let's explore some more container runtimes-

CRI-O is getting a lot of publicity which is an interface to decouple Kubernetes from various runtimes — CRI-O is an implementation of that which is OCI compliant. To this you can plug for example containerd (through cri-containerd) or rkt — where cri-o stands is nicely described in this blogpost. But by default it uses only runc.

RKT is a project originally created by CoreOS, which now belongs to RedHat CoreOS, it is probably the closest to an actual Docker competitor, rkt implements a modern, open, standard container format, the App Container (appc) spec, but can also execute other container images, like those created with Docker.

Singularity is the standard de-facto container runtime in the academic world for running HPC workloads. In the HPC (High Performance Computing) context, scheduling resources is an essential feature that can considerably determine the performance of the system. This type of applications run a wide range of computationally intensive tasks in various fields, some examples including quantum mechanics, weather forecasting, climate research, oil and gas exploration, molecular modeling, biological macromolecules and physical simulations. Centers and companies that use this type of applications cannot run the risk to run Docker on their environment because it simply does not fit their use case. They cannot afford to use a Root owned daemon process and security flaws arising due to that.

Kata containers is another interesting project that provides a secure container runtime with lightweight virtual machines that feel and perform like containers, but provide stronger workload isolation using hardware virtualization technology as a second layer of defense. Kata Containers community is stewarded by the OpenStack Foundation (OSF), which supports the development and adoption of open infrastructure globally.

Podman is an open-source project that is available on most Linux platforms. Podman is a daemonless container engine for developing, managing, and running Open Container Initiative (OCI) containers and container images on your Linux System. Podman provides a Docker-compatible command line front end that can simply alias the Docker cli, `alias docker=podman`.
Containers under the control of Podman can either be run by root or by a non-privileged user. Podman manages the entire container ecosystem which includes pods, containers, container images, and container volumes using the libpod library. Podman specializes in all of the commands and functions that help you to maintain and modify OCI container images, such as pulling and tagging. It allows you to create, run, and maintain those containers created from those images in a production environment.

So thats the container scene now. Comment here with updates as you see it evolving and I will keep updating the post. Agree thats its difficult to catch up, but evolution is good and lets see how far this goes!

GITFLOW - Branching Model for Repositories

What Is GitFlow?

GitFlow is a branching model for Git, created by Vincent Driessen. It has attracted a lot of attention because it is very well suited to collaboration and scaling the development team.

Key Benefits

Parallel Development

One of the great things about GitFlow is that it makes parallel development very easy, by isolating new development from finished work. New development (such as features and non-emergency bug fixes) is done in feature branches, and is only merged back into main body of code when the developer(s) is happy that the code is ready for release.

Although interruptions are a BadThing(tm), if you are asked to switch from one task to another, all you need to do is commit your changes and then create a new feature branch for your new task. When that task is done, just checkout your original feature branch and you can continue where you left off.

Collaboration

Feature branches also make it easier for two or more developers to collaborate on the same feature, because each feature branch is a sandbox where the only changes are the changes necessary to get the new feature working. That makes it very easy to see and follow what each collaborator is doing.

Release Staging Area

As new development is completed, it gets merged back into the develop branch, which is a staging area for all completed features that haven't yet been released. So when the next release is branched off of develop, it will automatically contain all of the new stuff that has been finished.

Support For Emergency Fixes

GitFlow supports hotfix branches - branches made from a tagged release. You can use these to make an emergency change, safe in the knowledge that the hotfix will only contain your emergency fix. There's no risk that you'll accidentally merge in new development at the same time.

How It Works

New development (new features, non-emergency bug fixes) are built in feature branches:

GitFlow feature branches

Feature branches are branched off of the develop branch, and finished features and fixes are merged back into the develop branch when they're ready for release:

GitFlow develop branch

When it is time to make a release, a release branch is created off of develop:

GitFlow release branch

The code in the release branch is deployed onto a suitable test environment, tested, and any problems are fixed directly in the release branch. This deploy -> test -> fix -> redeploy -> retest cycle continues until you're happy that the release is good enough to release to customers.

When the release is finished, the release branch is merged into master and into develop too, to make sure that any changes made in the release branch aren't accidentally lost by new development.

GitFlow master branch

The master branch tracks released code only. The only commits to master are merges from release branches and hotfix branches.

Hotfix branches are used to create emergency fixes:

GitFlow hotfix branch

They are branched directly from a tagged release in the master branch, and when finished are merged back into both master and develop to make sure that the hotfix isn't accidentally lost when the next regular release occurs.