DevOps methodologies and practices have transformed the complexities of IT infrastructure management into code that manages the entire IT infrastructure with little maintenance. We have a lot of configuration management tools, and orchestration tools to tailor our IT infrastructure-as-code, but selecting the right tool relies on numerous factors such as analyzing the pros and cons of the tools and understanding how it fits to our use case. They should ideally have no vendor lock-in, clear official documentation, good community support, easy integration with the platform, and be agnostic to different cloud providers and third party software.
Common Scenarios in IT Infrastructure Management
Provisioning and de-provisioning resources in a cloud environment is a common practice for testing and releasing a software product without any bugs. In conjunction with continuous integration and deployment tools, we may need to use both orchestration tools and configuration management tools as well. In any cloud environment, orchestration tools such as Terraform, CloudFormation, Heat, and AzureRM are responsible for provisioning infrastructure, and configuration management tools such as Chef, Ansible, Puppet, and Saltstack take care of installing the software packages in the server, configuring the services, and deploying the applications on top of it. But today, configuration management tools have to support, to some extent, provisioning resources in the cloud, and provisioning tools must support installing and configuring software on a newly created resource. It balances the complexity of provisioning and managing infrastructure. On the other hand, it is difficult to achieve everything with a single tool. The recommended way is to use both provisioning and configuration tools for managing infrastructure at scale.
Why Do We Need an Immutable Infrastructure?
Even we are managing an infrastructure with configuration management tools, there is a chance of having configuration drift in the servers if there are frequent configuration changes applied on the server. In order to avoid this situation, we should not change the configuration of the running server by either modifying it manually or through configuration management tools. Maintaining an immutable infrastructure is the best practice to avoid configuration drift. Immutable infrastructure is now becoming a popular term across the DevOps community. It is a practice of provisioning a new server for every config changes and d-provisioning the old ones. Provisioning tools like Terraform and CloudFormation support creating an immutable infrastructure to a great extent. For every software configuration changes, it will create a new infrastructure and deploy the configuration then delete the old ones. It will not create any confusions when we are managing a large infrastructure. We do not need to worry about the configuration changes and their impact over a period of time. In a production environment, DevOps practitioners often follow Blue-Green deployment to avoid unexpected issues, which leads to downtime in a production environment. Rollback is possible here and an application can enter into the previous state without any difficulties because we did not make any changes to the existing environment. Terraform helps to create an immutable infrastructure.

Fig. 1: Mutable Infrastructure

Fig. 2: Immutable Infrastructure
Infrastructure-as-Code
HashiCorp Terraform enables you to safely and predictably create, change, and improve infrastructure. It is an open-source tool that codifies APIs into declarative configuration files that can be shared amongst team members, treated as code, edited, reviewed, and versioned. Terraform supports storing the state of the infrastructure which helps us to prevent the configuration drift. We can store the state in the local environment or from remote key-value or object stores.

Fig. 3: Terraform provider and backend configuration
The syntax of Terraform configuration is called HashiCorp Configuration Language (HCL). Terraform can also support JSON configurations. It supports multiple providers for orchestration. The majority of code is written in GoLang. Terraform follows clear syntax to define the resources and it supports the most common data structures such as list, map, string to define the variables. It is quite simple to organize the code. We can read the credentials from the environment variables instead of defining it inside the Terraform configuration file.
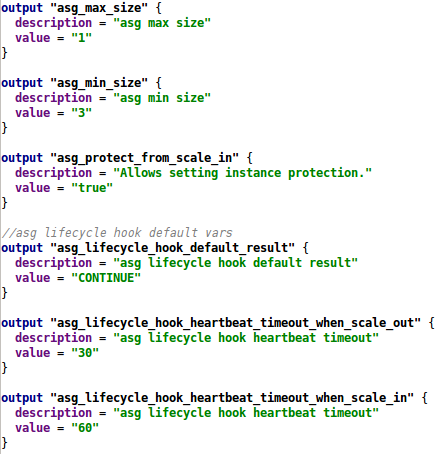
Fig. 4: Terraform Variables
Many open-source IDEs support development environments for Terraform modules. We can extend the functionality of the Terraform by writing custom plugins and provisioners to run script from bash, Ruby, Chef, etc. Reusable Terraform modules for various providers are available in Terraform registry. Terraform enterprise offers a web interface to manage Terraform and its state.
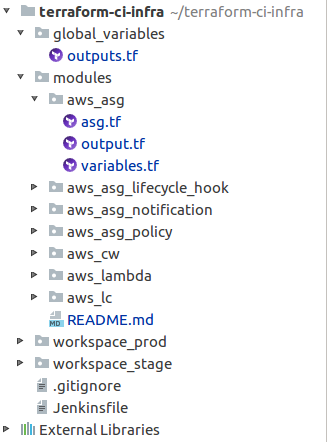
Fig. 5: Terraform Project Structure
Benefits of Using Terraform
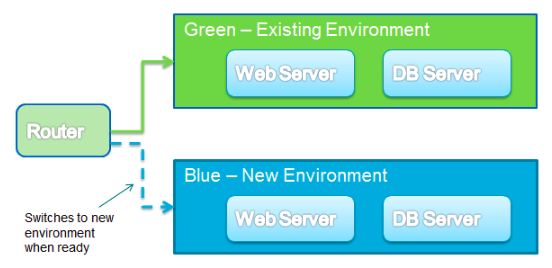
Fig. 6: Blue Green Deployment with Terraform
Defines infrastructure-as-code to increase operator productivity and transparency.
Terraform configuration can be stored in version control, shared, and collaborated on by teams of operators.
Tracks the complete history of infrastructure versions. Terraform state can be stored in a local disk as well as any one of the supported remote backends such as AWS S3, OpenStack Swift, Azure Blob, Consul, etc.
Terraform provides an elegant user experience for operators to safely and predictably make changes to infrastructure.
Terraform builds a dependency graph from the configurations, and walks this graph to generate plans, refresh state, and more.
Separates plans and reduces mistakes and uncertainty at scale. Plans show operators what would happen, and it applies execute changes.
Terraform can be used to create resources across all major infrastructure providers (AWS, GCP, Azure, OpenStack, VMware, and more) and third-party tools such as Github, Bitbucket, New Relic, Consul, and Docker.
Terraform lets operators easily use the same configurations in multiple places to reduce mistakes and save time.
We can use the same Terraform configuration to provision identical staging, QA, and production environments.
Common Terraform configurations can be packaged as modules and used across teams and organizations.

Fig. 7: Calling Terraform modules from the workspace
CI/CD Pipeline Workflow for Applying Changes to The Infrastructure Using Terraform
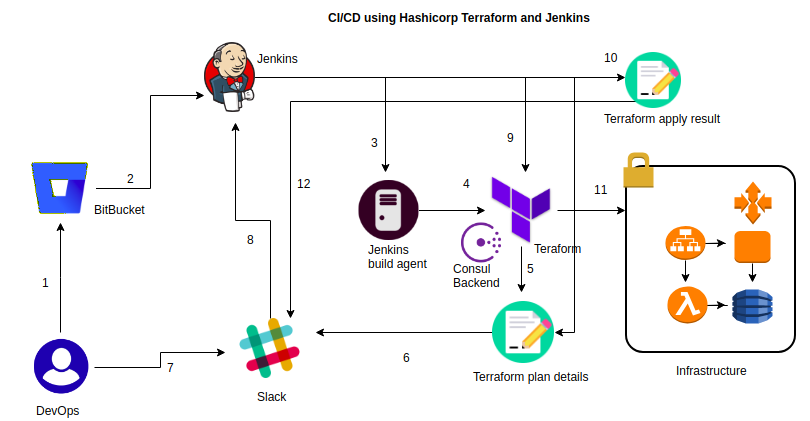
Fig. 8: CI/Cd Pipeline for Terraform Using Jenkins
The developer or operations engineer changes the Terraform configuration file in his local machine and commits the code to BitBucket.
Gitbucket Webhook triggers a continuous integration job to Jenkins.
Jenkins will pull the latest code from the configured repo which contains Terraform files to its workspace.
It reads the Terraform configuration then initializes the remote consul backend.
Terraform generates a plan about the changes that have to be applied on the infrastructure
Jenkins sends a notification to a Slack channel about the changes for manual approval.
Here, the user can approve or disapprove the Terraform plan.
The user input is sent to Jenkins server for proceeding with the further action.
Once the changes are approved by an operator, Jenkins will execute the
terraform applycommand to reflect the changes to the infrastructure.Terraform will create a report about the resources and its dependency created while executing the plan.
Terraform will provision the resources in the provider environment.
Jenkins will again send a notification to the Slack channel about the status of the infrastructure after the applying changes on it. Once the job is executed, Jenkins pipeline job is configured to clean up the workspace created by the job.
How to Setup the Deployment Environment:
Create a repo in SCM tools like Gitlab or BitBucket and commit the Terraform configuration and its dependency module to the repo. If you are using any third-party remote module as a dependency, it will be automatically downloaded while execution.
If you do not have Jenkins server, then just pull a Jenkins Docker image and run it in your local machine. If you are setting it up in a cloud environment, check the Jenkins virtual machine image from the marketplace to set up the environment and configure the required plugins.
Create a webhook in your BitBucket repo settings to invoke an HTTP call to your Jenkins callback URL for triggering continuous integration job.
If you have an existing Jenkins server, ensure pipeline plugin is installed in the Jenkins server. Otherwise go to "Manage Plugins" and install the pipeline plugin.
In this project, we are using consul as a remote backend for state storing and state locking. It is not recommended to use in the local state for the case where multiple people involved in the project and for production deployments. It is good to use remote backend which provides highly available storage with state lock functionalities to avoid writing the state by multiple users at a time.
If you do not have consul key-value store in your environment, just pull consul Docker image and set up a single node cluster. If it is production deployment, set up a distributed key-value store.
Create an application in Slack and note down the slack integration details for configuring it in Jenkinsfile.
Configure your provider details and backend details in the main Terraform configuration file either by environment variable or persisting in a repo. In my case, I am going to provision a resource in AWS and my CI server is hosted in AWS. So I am assigning an IAM Role to my server with sufficient privileges.
Create a new project in Jenkins by using pipeline plugin.
Add the Jenkinsfile where the pipeline stages are defined. Save the job and trigger it manually for testing. Then apply changes to the configuration and commit the changes to the BitBucket and ensure the job is automatically triggered. Check Jenkins log for more details about the job.
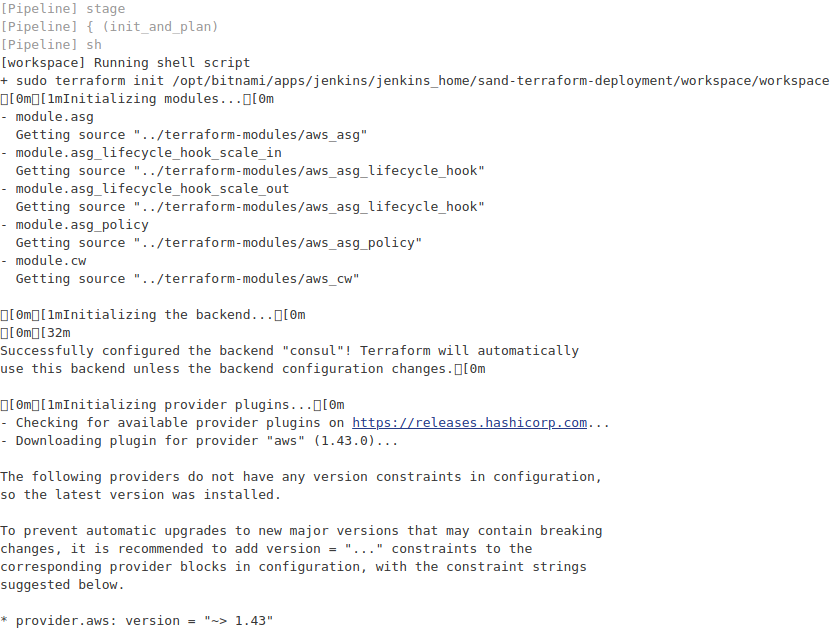
Fig. 9 Jenkins Log
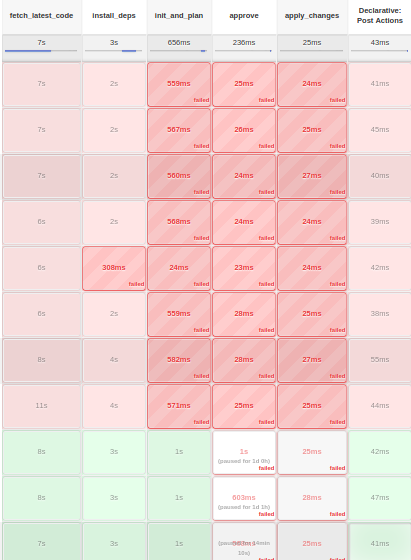
Fig. 10: Build History
No comments:
Post a Comment
Hi, Leave a comment here and one of the binary piper's will reply soon :)