![]()
![]() Here, we will see how to set up pfSense 2.0.1 up as an Internet Gateway with Squid Proxy / Squidguard Filtering. I will also show that you have to configure some extra features of pfSense like traffic shapping with squid. This type of configuration would be useful for people who want to set up wireless hot spots or Internet cafe's etc.
Here, we will see how to set up pfSense 2.0.1 up as an Internet Gateway with Squid Proxy / Squidguard Filtering. I will also show that you have to configure some extra features of pfSense like traffic shapping with squid. This type of configuration would be useful for people who want to set up wireless hot spots or Internet cafe's etc.
This tutorial assumes that you already have a pfsense (version 2.0.1 Minimum) installation running with your network interfaces configured and basic firewall rules configured.
Installing Packages to pfsense
First of all lets start by installing the extra packages that we are going to requires
Login to your pfsense's Web Administrator, and click on "Server -> Packages", scroll down the list and find squid and click on "+" button to install, wait for the process to finish then return to the packages section and look for squidguard and install that package as well.


To confirm that the packages have been installed, refresh the web interface and goto "Services" menu and look for Proxy Server & Proxy Filter, if they both appear in the menu they have been installed correctly, reboot the pfSense Box.

NOTE: There have been a couple of instances where We have had to reinstall the squid package right after We have installed the squidguard package, the reason behind this is after We install the squidguard package We are unable to access the Proxy Server Configuration, if this happens go back to the packages menu, click on installed packages tab, then select reinstall on the squid server entry (this has only happened in versions prior to 2.0.1).
Configuring Proxy Server Package
Once pfsense has been rebooted we want to configure the proxy server settings, (in this tutorial we are going to setup the proxy server as a transparent proxy, if you want to set this part up differently please do you research into squid configuration, the pfsense web site has configuration guides for squid aswell), click on Services -> Proxy Server.
On the General Tab, you want to set the following settings, the Proxy Interface Option should be set to "LAN", and because We are setting this up as a transparent proxy server, tick the "Transparent Proxy" check box.

We recommend logging to be enabled on your proxy server, as it will come in handy should you need to trouble shoot a issue or just see what people are doing on the Internet etc. Tick the "Enabled Logging" Checkbox, set the log store to the default location " /var/squid/logs " rotate your logs every 7 days, set your proxy port to port number 3128 ( remember this port number as we will need it when we set the firewall rules up), add a visible hostname and an administrator e-mail address, and set your required language, then click on the Save button.

Next click on the "Cache Mgmt" tab, by default the Hard Disk Cache Size is set to 100mb, We strongly recommend that you increase this, now it will depend on how big your HDD is that will determine how big you make it, but also keep in mind the more people using this proxy the more space you need to allocate, after that is set leave the rest of the page at default settings and click on Save.

Click on the Access Control Tab next, in the allowed subnets field type in your required subnets, (eg: 192.168.255.0/24); keep in mind that if you have more then one subnet accessing this proxy you need to specify each subnet on its own line.

Scroll down until you see "ACL Safeports and ACL SSLPorts" in these fields you will have to type in what ports you want open threw your proxy server, you will need to do some research on this, find out what applications are being used on this network, and specifiy your required porst effectlive. For this howto I am just going to use port 80 and 443 as these are the only too ports that I need to see if you have web pages and for some basic Internet applications to work, if you want other applications to have access to the Internet, do some reading on what ports are required and then update the pfsense box, once set click on Save.

Now for the people who wish to throttle the speed of which users get access to the Internet, click on the Trafic Mgmt tab, and set (in kilobytes) what speed you want to restrict users too, click on Save once done.

Configuring SquidGuard Filtering
Now thats is the proxy server configured, next we are going to configure SquidGuard, click on the Services menu and select the Proxy Filter button, tick the following 3 check boxes "Enable", "Enable GUI Log" and "Enable Log" then click the Save button, once the page has reloaded click on apply and then confirm that the Squidguard service is running by making sure the Squidguard status is set to STARTED.


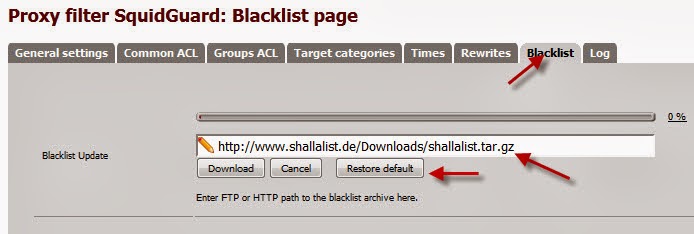
Stay on the General Settings Tab and scroll down to the blacklist area and tick the box that says Enable Blacklist, and in the blacklist URL type the following http://www.shallalist.de/Downloads/shallalist.tar.gz, and click Save; this is so we can download the blacklist data. Click on the Black list tab and add the save the same URL as before to the Update Address and click on Download. Wait for the process to complete.


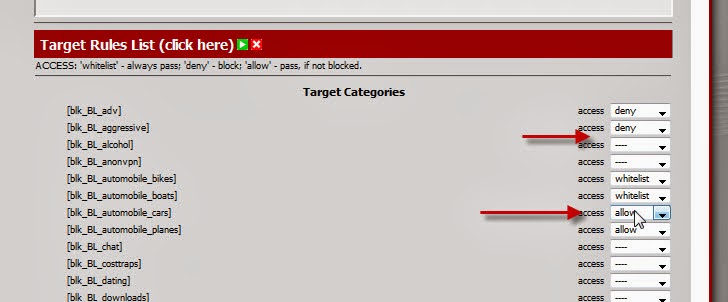
Next click on the common ACL tab, and the click on Target Rules List, and select every rule that you want block or allow, then add a message to the Proxy Denied Error Field, I am currently just using the default one they suggest (look at sceenshot for example), leave redirect mode at Int Error page so it will use the message you type in, tick the Log Check box then click on Save.


Once that is set up test your proxy and make sure everything is working.
Credits to the author of this tutorial on HowtoForge Kyle Hartigan