Search Posts on Binpipe Blog

PFSense Firewall with Squid Proxy and Filtering


Here, we will see how to set up pfSense 2.0.1 up as an Internet Gateway with Squid Proxy / Squidguard Filtering. I will also show that you have to configure some extra features of pfSense like traffic shapping with squid. This type of configuration would be useful for people who want to set up wireless hot spots or Internet cafe's etc.

This tutorial assumes that you already have a pfsense (version 2.0.1 Minimum) installation running with your network interfaces configured and basic firewall rules configured.


Installing Packages to pfsense

First of all lets start by installing the extra packages that we are going to requires

Login to your pfsense's Web Administrator, and click on "Server -> Packages", scroll down the list and find squid and click on "+" button to install, wait for the process to finish then return to the packages section and look for squidguard and install that package as well.


To confirm that the packages have been installed, refresh the web interface and goto "Services" menu and look for Proxy Server & Proxy Filter, if they both appear in the menu they have been installed correctly, reboot the pfSense Box.


NOTE: There have been a couple of instances where We have had to reinstall the squid package right after We have installed the squidguard package, the reason behind this is after We install the squidguard package We are unable to access the Proxy Server Configuration, if this happens go back to the packages menu, click on installed packages tab, then select reinstall on the squid server entry (this has only happened in versions prior to 2.0.1).


Configuring Proxy Server Package

Once pfsense has been rebooted we want to configure the proxy server settings, (in this tutorial we are going to setup the proxy server as a transparent proxy, if you want to set this part up differently please do you research into squid configuration, the pfsense web site has configuration guides for squid aswell), click on Services -> Proxy Server.

On the General Tab, you want to set the following settings, the Proxy Interface Option should be set to "LAN", and because We are setting this up as a transparent proxy server, tick the "Transparent Proxy" check box.


We recommend logging to be enabled on your proxy server, as it will come in handy should you need to trouble shoot a issue or just see what people are doing on the Internet etc. Tick the "Enabled Logging" Checkbox, set the log store to the default location " /var/squid/logs " rotate your logs every 7 days, set your proxy port to port number 3128 ( remember this port number as we will need it when we set the firewall rules up), add a visible hostname and an administrator e-mail address, and set your required language, then click on the Save button.


Next click on the "Cache Mgmt" tab, by default the Hard Disk Cache Size is set to 100mb, We strongly recommend that you increase this, now it will depend on how big your HDD is that will determine how big you make it, but also keep in mind the more people using this proxy the more space you need to allocate, after that is set leave the rest of the page at default settings and click on Save.


Click on the Access Control Tab next, in the allowed subnets field type in your required subnets, (eg: 192.168.255.0/24); keep in mind that if you have more then one subnet accessing this proxy you need to specify each subnet on its own line.


Scroll down until you see "ACL Safeports and ACL SSLPorts" in these fields you will have to type in what ports you want open threw your proxy server, you will need to do some research on this, find out what applications are being used on this network, and specifiy your required porst effectlive. For this howto I am just going to use port 80 and 443 as these are the only too ports that I need to see if you have web pages and for some basic Internet applications to work, if you want other applications to have access to the Internet, do some reading on what ports are required and then update the pfsense box, once set click on Save.


Now for the people who wish to throttle the speed of which users get access to the Internet, click on the Trafic Mgmt tab, and set (in kilobytes) what speed you want to restrict users too, click on Save once done.


Configuring SquidGuard Filtering

Now thats is the proxy server configured, next we are going to configure SquidGuard, click on the Services menu and select the Proxy Filter button, tick the following 3 check boxes "Enable", "Enable GUI Log" and "Enable Log" then click the Save button, once the page has reloaded click on apply and then confirm that the Squidguard service is running by making sure the Squidguard status is set to STARTED.


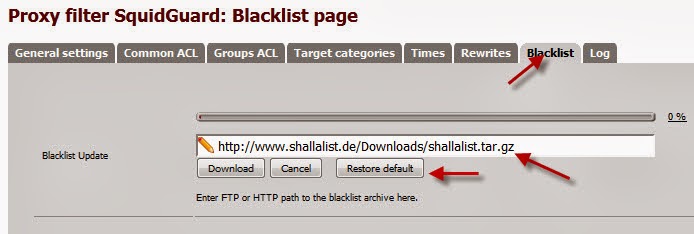
Stay on the General Settings Tab and scroll down to the blacklist area and tick the box that says Enable Blacklist, and in the blacklist URL type the following http://www.shallalist.de/Downloads/shallalist.tar.gz, and click Save; this is so we can download the blacklist data. Click on the Black list tab and add the save the same URL as before to the Update Address and click on Download. Wait for the process to complete.



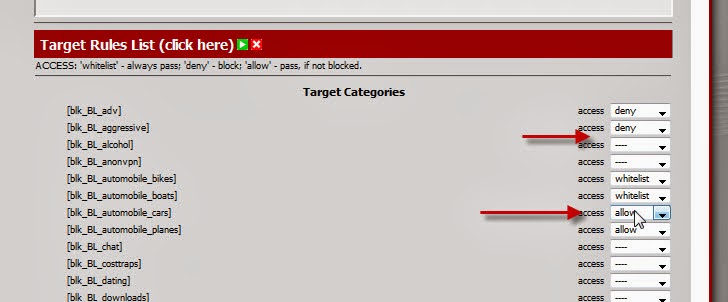
Next click on the common ACL tab, and the click on Target Rules List, and select every rule that you want block or allow, then add a message to the Proxy Denied Error Field, I am currently just using the default one they suggest (look at sceenshot for example), leave redirect mode at Int Error page so it will use the message you type in, tick the Log Check box then click on Save.



Once that is set up test your proxy and make sure everything is working.


Credits to the author of this tutorial on HowtoForge Kyle Hartigan

Red5 Media Server Installation on CentOS 6


Red5 Media Server is a powerful media streaming server. I am still probing the possibilities of using this server and RTMP in various applications. You can follow these steps to install it on your own server and test it out.
Step 1: Installing  Java

You may skip this steps if you have already installed java on your system else use below link to install latest java version.

Step A: Download Archive File

Download java fromhttp://www.oracle.com/technetwork/java/javase/downloads/jdk7-downloads-1880260.html.

# cd /opt/  # wget http://download.oracle.com/otn-pub/java/jdk/7u25-b15/jdk-7u25-linux-i586.tar.gz?AuthParam=1372657186_d532b6d28fdb7f35ec7150a1d6df6778  

Extract downloaded archive using following command.

# tar xzf jdk-7u25-linux-i586.tar.gz  
Step B: Install JAVA using Alternatives

After extracting java archive file, we just need to setup to use newer version of java using alternatives. Use the following commands to do it.

# cd /opt/jdk1.7.0_25  # alternatives --install /usr/bin/java java /opt/jdk1.7.0_25/bin/java 2  # alternatives --config java    There is 1 program that provides 'java'.      Selection    Command  -----------------------------------------------  *+ 1           /opt/jdk1.7.0_25/bin/java    Enter to keep the current selection[+], or type selection number: 1  

Now you have successfully configured java in your system. Go to next step to check current installed version.

Step C: Check Version of JAVA .

Use following command to check which version of java is currently being used by system.

# java -version  
java version "1.7.0_25"  Java(TM) SE Runtime Environment (build 1.7.0_25-b15)  Java HotSpot(TM) Client VM (build 23.25-b01, mixed mode)  
Step D: Setup Environment Variables

Most of java based application’s uses environment variables to work. Use following commands to setup it.

  • Setup JAVA_HOME Variable
  • # export JAVA_HOME=/opt/jdk1.7.0_25  
  • Setup JRE_HOME Variable
  • # export JRE_HOME=/opt/jdk1.7.0_25/jre  
  • Setup PATH Variable
  • # export PATH=$PATH:/opt/jdk1.7.0_25/bin:/opt/jdk1.7.0_25/jre/bin

Step 2: Install the Apache Ant Binary

Apache ant is a tool similar to make. It is implemented using the java language. It is used for automating software build processes and is best suited to building Java projects. Download the latest apache ant archive and install it.

# cd /opt/  # wget http://archive.apache.org/dist/ant/binaries/apache-ant-1.9.0-bin.tar.gz  # tar xzf apache-ant-1.9.0-bin.tar.gz  # mv apache-ant-1.9.0 /usr/local/apache-ant
Step 3: Setup Environment Variables

Its necessory to set environment variables to make it working.

# echo 'export ANT_HOME=/usr/local/apache-ant' >> /etc/bashrc  # echo 'export JAVA_HOME=/opt/jdk1.7.0_25' >> /etc/bashrc  # echo 'export PATH=$PATH:/usr/local/apache-ant/bin' >> /etc/bashrc  # echo 'export CLASSPATH=.:$JAVA_HOME/lib/classes.zip' >> /etc/bashrc    # source /etc/bashrc
Step 4: Checkout Red5 using Subversion

Red5 source code is available under subversion repository also. So its easier to download code using subversion.

# cd /usr/local/  # svn co http://red5.googlecode.com/svn/java/server/tags/1_0/  red5
Step 5: Build Red5 using Ant

After finishing downloading code, lets build Red5 using ant libraries using following commands.

# cd /usr/local/red5  # ant prepare  # ant dist
Step 6: Start Red5 Media Server

Red5 media server uses 5080 tcp port for provide web interface.

# cd /usr/local/red5/dist  # ./red5.sh &
Step 7: Access Red5 Media Server

Red5 demo pages and application can be accessed at http://servername_or_IP:5080/

URL:   http://192.168.x.y:5080


Nmap Command Usage in Linux Server

If you don't have NMAP yet in your server, use this link to get it installed in your server. The following Nmap commands always come handy, so check them out:

Scan For Unused IP Address

# nmap -T4 -sP 192.168.0.0/24 && egrep "00:00:00:00:00:00" /proc/net/arp


Get Info About Remote Host Ports And OS Detection

# nmap -sS -P0 -sV -O targetIP


Get List of Servers With A Specific Port Open

# nmap -sT -p 80 -oG - 192.168.0.* | grep open

Change the -p argument for the port number.

Scan Network for Rogue APs

# nmap -A -p1-85,113,443,8080-8100 -T4 --min-hostgroup 50 --max-rtt-timeout 2000 --initial-rtt-timeout 300 --max-retries 3 --host-timeout 20m --max-scan-delay 1000 -oA wapscan 10.0.0.0/8


Find All Active IP Addresses In A Network

# nmap -sP 192.168.0.*


Use A Decoy IP While Scanning Ports

# sudo nmap -sS targetIP -D fakeIP


How Many Linux And Windows Devices Are On Your Network?

# sudo nmap -F -O 192.168.0.1-255 | grep "Running: " > /tmp/os; echo "$(cat /tmp/os | grep Linux | wc -l) Linux device(s)"; echo "$(cat /tmp/os | grep Windows | wc -l) Window(s) devices"  


UDP Scanning

# sudo nmap -sU -P0 -T Aggressive -F targetIP


Disable unwanted services in CentOS

You can use the following shell script in centos to disable inwanted services which may consume RAM. Please make sure you check which services you need to disable according to your requirement. My list of services in the below script is just indicative.

#!/bin/bash -x

# Disable unwanted services in Linux


services="rpcbind portreserve qpidd kdump abrt-ccpp abrt-oops abrtd ktune matahari-broker matahari-host matahari-network matahari-rpc matahari-service matahari-sysconfig quota_nld rngd tuned ntpdate iscsi iscsid tcsd saslauthd rawdevices isdn dnsmasq capi avahi-dnsconfd avahi-daemon NetworkManager NetworkManagerDispatcher acpid anacron apmd atd auditd autofs bluetooth conman cups cpuspeed dhcdbd dund firstboot gpm haldaemon messagebus mdmonitor mdmpd netplugd restorecond hidd ibmasm ip6tables irda irqbalance kudzu lvm2-monitor mcstrans microcode_ctl multipathd netconsole netfs nfs nfslock nscd oddjobd pand pcscd portmap psacct rdisc readahead_early readahead_later rpcgssd rpcsvcgssd rpcidmapd sendmail smartd wpa_supplicant ypbind yum-updatesd"


for service in $services; do

  /sbin/chkconfig --del $service

done

Take mysqldump without increasing server load

If you have a very high traffic website and you need to take the dump
the database without affecting the load of the sever then use the
following code snippet:

# mysqldump -u root -p --single-transaction --quick DATABASENAME > DATABASENAME.sql

Install Asterisk in CentOS and build your own VOIP Server

Recently, I was asked to integrate Asterisk to VTiger CRM's PBX Manager module, so that all the Leads appeared as a 'click-to-call' link and the calls are placed via an internal VOIP Server. There were other features like call-recording and click-to-play recorded calls from the CRM as well as 'call-forwarding' and 'call-conference'. We will discuss these in some future posts. In this one, I would like to just jot down I steps I followed to build the VOIP Server. We will discuss the V-Tiger part later on.

Download Asterisk from their Official website


 # tar -xzf asterisk-1.8-current.tar.gz
 # cd asterisk-1.8.20.1


NOTE: Make sure you have gcc compiler pre installed in your system before moving towards next step


 # ./configure


                .$$$$$$$$$$$$$$$=..
             .$7$7..          .7$$7:.
           .$$:.                 ,$7.7
         .$7.     7$$$$           .$$77
      ..$$.       $$$$$            .$$$7
     ..7$   .?.   $$$$$   .?.       7$$$.
    $.$.   .$$$7. $$$$7 .7$$$.      .$$$.
  .777.   .$$$$$$77$$$77$$$$$7.      $$$,
  $$$~      .7$$$$$$$$$$$$$7.       .$$$.
 .$$7          .7$$$$$$$7:          ?$$$.
 $$$          ?7$$$$$$$$$$I        .$$$7
 $$$       .7$$$$$$$$$$$$$$$$      :$$$.
 $$$       $$$$$$7$$$$$$$$$$$$    .$$$.
 $$$        $$$   7$$$7  .$$$    .$$$.
 $$$$             $$$$7         .$$$.
 7$$$7            7$$$$        7$$$
  $$$$$                        $$$
   $$$$7.                       $$  (TM)
    $$$$$$$.           .7$$$$$$  $$
      $$$$$$$$$$$$7$$$$$$$$$.$$$$$$
        $$$$$$$$$$$$$$$$.
 configure: Package configured for:
 configure: OS type  : linux-gnu
 configure: Host CPU : i686
 configure: build-cpu:vendor:os: i686 : pc : linux-gnu :
 configure: host-cpu:vendor:os: i686 : pc : linux-gnu :


Once the configure step is completed successfully you will see the above output on the screen

 # make
 # make install 
 # make samples


Once all the above steps are completed successfully it is time to start the asterisk services

 # asterisk -vvvc
 Asterisk Ready.
 *CLI>


Now let us configure some local extensions to verify extension-extension calling

 *CLI> !

Using ! (exclamation mark) will take you out of the asterisk CLI prompt but the service will be running in the background)

Or IF YOU WANT TO INSTALL WITH YUM

Installing a binary distribution of Asterisk makes it easier to maintain your system. Using the package management tools that are included with your Linux distribution, you can install and update software without manually managing dependencies (libraries and utilities on which applications rely). Currently Asterisk is available for automated binary installation using the 'yum' utility on CentOS 5 Linux and for RedHat Enterprise Linux 5.

The first step is to add the Asterisk yum repositories to your CentOS or RedHat system. This is done by creating an entry in the yum configuration directory (/etc/yum.repos.d by default).

Use the text editor of your choice to create a new file named "centos-asterisk.repo" in the "/etc/yum.repos.d" folder. Add the following text to the file:

[asterisk-tested]    name=CentOS-$releasever - Asterisk - Tested    baseurl=http://packages.asterisk.org/centos/$releasever/tested/$basearch/    enabled=0    gpgcheck=0    #gpgkey=http://packages.asterisk.org/RPM-GPG-KEY-Digium        [asterisk-current]    name=CentOS-$releasever - Asterisk - Current    baseurl=http://packages.asterisk.org/centos/$releasever/current/$basearch/    enabled=1    gpgcheck=0    #gpgkey=http://packages.asterisk.org/RPM-GPG-KEY-Digium    
Save the new file and create another named "centos-digium.repo" and insert the following text:
[digium-tested]    name=CentOS-$releasever - Digium - Tested    baseurl=http://packages.digium.com/centos/$releasever/tested/$basearch/    enabled=0    gpgcheck=0    #gpgkey=http://packages.digium.com/RPM-GPG-KEY-Digium        [digium-current]    name=CentOS-$releasever - Digium - Current    baseurl=http://packages.digium.com/centos/$releasever/current/$basearch/    enabled=1    gpgcheck=0    #gpgkey=http://packages.digium.com/RPM-GPG-KEY-Digium  

At this point your system has been updated to use the Asterisk and Digium repositories in addition to the base CentOS repositories. You are now ready to install Asterisk. To star the installation, execute the following at the Linux command line:

[root@localhost~]# yum install asterisk16 asterisk16-configs asterisk16-voicemail    dahdi-linux dahdi-tools libpri

The system will respond with something like:

[root@localhost yum.repos.d]# yum install asterisk16  Loaded plugins: fastestmirror    Loading mirror speeds from cached hostfile...

Type "y" for "Yes," press the Enter key and relax for a few minutes

Congratulations, you now have a CentOS or RedHat system with a complete version of Asterisk installed. Test out your new install by starting Asterisk:

[root@localhost yum.repos.d]# asterisk -vvvgci

Account


 # cd /etc/asterisk


Take a backup of the original sip sile and create a new one with the followng details

 # mv sip.conf  sip.conf.orig

 # vi sip.conf
 [general]
 port=5060
 bindaddr=0.0.0.0

 [1000]
 type=friend
 host=dynamic
 secret=1000

 [1001]
 type=friend
 host=dynamic
 secret=1001


Now let me explain you the above used syntax
port - This is the port number which Asterisk uses to communicate
bindaddr - All the client IP range the server will listen to
type - type of connection (peer — outcoming calls only, user — incoming calls, friend — both incoming and outcoming calls)
host - Hostname of the phone (Dynamic Host name)
secret - Passsword used for authentication user

Configuring Extension Dial Plan


 # mv extensions.conf extesnions.conf.orig

 # vi extensions.conf
 [general]
 static=yes
 writeprotect=no
 priorityjumping=no
 autofallthrough=yes
 clearglobalvars=no

 [default]
 exten => 1000,1,Dial(SIP/1000,10)
 exten => 1001,1,Dial(SIP/1001,10)


The above shown dial plan is one of the most basic which means that is a user dials 1000 from his extension using SIP Phone it will go to 1000 Extension and if the phone is not picked up till 10 seconds then the call will hangup. The same will happen for extension 1001

Now we are done with the initial configuration of Asterisk to verify internal calls. Restart the asterisk services
To connect to asterisk CLI

 # asterisk -r
 server*CLI>reload

This will reload all the configuration files of asterisk

Let us configure two softphones for verifying the calls
For this demo purpose I will be using X-Lite and QuteCom
You can download the same from the following locations

X-Lite

QueteCom

Once the softwares are downloaded and installed follow the below screenshots to configure your softphones

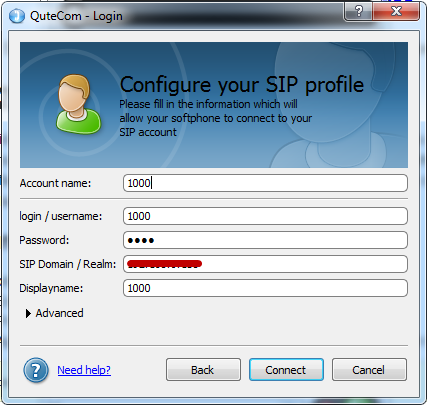
Configuring Extension 1000 on QueteCom


Use your server IP at the place for SIP Domain For example: 192.168.0.xx

Configuring Extension 1001 on X-Lite


Now when both the Softphones are configure try to make calls between each other

Calling from 1001 to 1000


So you can pick the call on the other side and start talking. 
Now this was the most basic configuration of Asterisk but it can get very vast and complex moving more and more ahead.

Courtesy: http://www.golinuxhub.com

Disabling Ctrl+Alt+Delete Reboot Shortcut in Linux Systems

Pressing CTRL+ALT+DELETE on most Linux distributions will start the soft reboot process. On production systems, it is advisable to disable this because someone might make a mistake and reboot the system, specially those who are used to administrate Windows servers. Also what is strange about this shortcut is that you don’t need to be logged in (no user/password needed – but only console access) to reboot the system.

To disable this behavior, open the /etc/init/control-alt-delete.conf configuration file in a text editor such as vi, nano or pico. (The same settings are present in /etc/inittab in RHEL/CentOS 5 systems)
Then replace the actual shutdown action with an alert:

# control-alt-delete - emergency keypress handling
#
# This task is run whenever the Control-Alt-Delete key combination is
# pressed. Usually used to shut down the machine.

start on control-alt-delete

#exec /sbin/shutdown -r now "Control-Alt-Delete pressed"
exec echo "CONTROL-ALT-DELETE DISABLED BY ADMIN"

The init daemon should automatically reload this change, but just to be sure run this command:

initctl reload-configuration

Code Snippet: To find the number of hits per domain in a Shared Server (CPanel on Linux)

You can run the following command line recipe to find the number of hits per domain in a Shared Server (CPanel on Linux):

 a=$(date +%s); touch /root/$a; for domains in `cat /etc/userdomains | cut -d : -f 1`; do wc -l /etc/httpd/domlogs/$domains >> /root/$a 2>/dev/null; done; cat /root/$a | grep -v "0 /etc/" | sort -nk1 | tail -6 >> /root/test.txt; rm -rf /root/$a; for ((c=1; c<=6; c++)); do awk "NR==$c{print;exit}" /root/test.txt | awk {'print $2'} | xargs head -n1 | cut -d= -f1 | sed '/^$/d' | awk {'printf "Since " $4 "] there were "'}; awk "NR==$c{print;exit}" /root/test.txt | awk {'printf $1 " hits to "'}; awk "NR==$c{print;exit}" /root/test.txt | awk -F/ {'print "["$5"]"'}; done; rm -f /root/test.txt;


The output will something be like this:

Since [18/Jun/2013:13:06:25] there were 5163 hits to [test.com]
Since [18/Jun/2013:13:04:46] there were 7402 hits to [test1.com]
Since [18/Jun/2013:13:06:43] there were 8586 hits to [test2.com]
Since [18/Jun/2013:13:04:58] there were 9808 hits to [test3.info]
Since [18/Jun/2013:13:04:57] there were 15218 hits to [test4.com]
Since [18/Jun/2013:13:04:51] there were 26965 hits to [test5.com]

Code Snippet: User wise Memory Consumption in a CPanel based Linux Server


Run the following command snippet to output a neatly formatted User wise Memory Consumption in a CPanel based Linux Server :

OUT=$(/usr/local/cpanel/bin/dcpumonview | grep -v Top | sed -e 's#<[^>]*># #g' | while read i ; do NF=`echo $i | awk {'print NF'}` ; if [[ "$NF" == "5" ]] ; then USER=`echo $i | awk {'print $1'}`; OWNER=`grep -e "^OWNER=" /var/cpanel/users/$USER | cut -d= -f2` ; echo "$OWNER $i"; fi ; done) ; (echo "USER CPU" ; echo "$OUT" | sort -nrk4 | awk '{printf "%s %s%\n",$2,$4}' | head -5) | column -t ; echo; (echo -e "USER MEMORY" ; echo "$OUT" | sort -nrk5 | awk '{printf "%s %s%\n",$2,$5}' | head -5) | column -t

Apache Log File Analysis with Go Access

GoAccess is linux terminal’s real time Apache Log Analyzer and gives you interactive view of Apache access log. It is super fast and provides you real time reporting on the fly.
Currently it support Apache two standard reports 1. Combined Log Format 2. Common Log Format. You can also monitor Nginx log if it is configured with Apache log format.

Here we will compile it on CentOS 6 64bit Server.

Installing dependencies :
yum install glib2 glib2-devel glibc make geoip

Download and Compile GoAccess-v0.4.2 :
wget http://sourceforge.net/projects/goaccess/files/0.4.2/goaccess-0.4.2.tar.gz/download
./configure
make
make install

How to use GoAccess?
To view access log in interactive mode
goaccess -f /var/log/httpd/access.log
below options can be used before -fswitch :

-b # Enable bandwidth consumptions.  -s # Enable HTTP status codes reporting  -a # Enable User Agents list by host.  -e # This is nice option, if you would like to exclude IP from       being counted under HOST section.

Here is complete syntax to use with above options:
goaccess -b -s -e 100.100.XX.XX -a -f /var/log/httpd/access.log