Once a Kubernetes Cluster is up and running it is not over until the pods are able to recieve traffic from external world. There are several methods to route internet traffic to your Kubernetes cluster. However, when choosing the right approach, we need to consider some factors such as cost, security, and maintainability. This article guides you to choose a better approach to route the external traffic to your Kubernetes cluster by considering the above facts.
Traffic flow to Kube service
Before routing external traffic, let's get some knowledge on routing mechanism inside the cluster. In Kubernetes, all the applications are running inside a pod. A pod is a container which gives more advantages over static instances.
To access an application running inside a pod, there should be a dedicated service for it. The mapping between the service and pod is determined by a 'label selector' mechanism. Below is a sample yaml which can be used to create a hello world application. There you can get a clear idea about the 'label selector' mapping.
--- |
Let's see how can we create a Kubernetes service for the above hello world application. In this example, I have used the"app=helloworld" label to define my application. Now you need to use this 'helloworld' word as the selector of your service. Then only your service identify which pods to be looked after by the service. Below is the sample service corresponding to the above application,
apiVersion: v1 |
This specification will create a new Service named "service-helloworld" which targets TCP port 8080 on any Pod with the "app=helloworld" label.
Here you can see the type of the above service is "ClusterIP". It is the default type of a Kubernetes service. Other than this, there are another two types of services called "NodePort" and "LoadBalancer". The mechanism of routing traffic to a Kuberntes cluster will depend on the service type you used when defining a service. Let's dig into more details.
LoadBalancer: Exposes the service externally using a cloud provider's load balancer. ( ex: In AWS, it will create an ELB for each service which exposes the type as the "LoadBalancer". ) Then you can access the service using the dedicated DNS name of the ELB.
NodePort: Exposes the service on each Node's IP at a static port. You can connect to the NodePort service outside the cluster by requesting <NodeIP>:<NodePort>. This is a fixed port to a service and it is in the range of 30000–32767.
3. ClusterIP: ClusterIP service is the default Kubernetes service. Exposes the service on a cluster-internal IP. Choosing this value makes the service only reachable from within the cluster. But to expose these services to outside you need ingress controller inside your cluster.

By considering the above services types, the easiest way of exposing a service to outside the cluster is using the "LoadBalancer" service type. But these cloud load balancers cost money and every Loadbalancer Kubernetes services create a separate cloud load balancer by default. Therefore this service type is very expensive. Can you bear the cost of a deployment which creates a separate ELB (if the cluster is in AWS) for every single service you create inside the k8s cluster?

The next choice we have is the 'NodePort' service type. But choosing the NodePort as the service type gives some disadvantages due to several drawbacks. Because by the design, it bypasses almost all the network security provided by the Kubernetes cluster. It allocates a port from a range 30000–32767 dynamically. Therefore standard ports such as 80, 443 or 8443 are cannot be used. Because of this dynamic allocation, you do not know the assigned port in advance. you need to examine the allocated port after creating the service and on most hosts, you need to open the relevant port in firewall after the service creation.
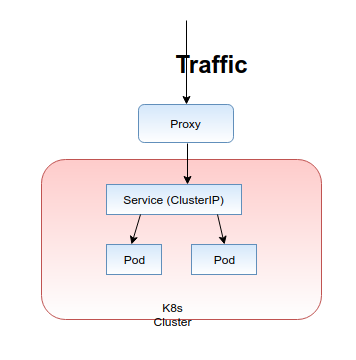
The final and the most recommended approach to routing traffic to your Kubernentes service is 'ClusterIP' service type. The one and only drawback of using 'ClusterIp' is that you cannot call the services from the outside of the cluster without using a proxy. because by default, 'ClusterIP' is only accessible by the services inside its own Kubernetes cluster. Let's talk about how we can get the help of Kubernetes ingress controller to expose ClusterIP services to outside the network.
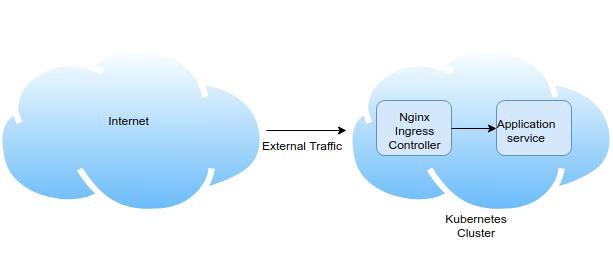
Following diagram illustrates the basic architecture of the traffic flow to your ClusterIP services through the Kubernetes ingress controller.
If you have multiple services deployed in Kubernetes cluster, I recommended the above approach due to several advantages.
Ingress enables you to configure rules that control the routing of external traffic to the services.
You can handle SSL/TLS termination at the Nginx Ingress Controller level.
You can get the support for URI rewrites.
When you need to provide external access to your Kubernetes services, you need to create an Ingress resource that defines the connectivity rules, including the URI path and backing service name. The Ingress controller then automatically configures a frontend load balancer to implement the Ingress rules.
Let's deploy below deployment in your Kubernetes cluster using a helm chart.
Helm is the package manager for Kubernetes and it allows you to deploy the above deployment using a single "helm install" command.
Before going through the below steps, make sure that you already have 'kubectl' access for your k8s cluster from your machine and install helm in it. Then you can execute the below steps,
1. git clone https://github.com/prasanjit-/helm-charts.git
2. cd helm-charts/
3. helm init
4. helm install --name my-kube-deployment
If it is deployed successfully you will be able to see the below output in your terminal.
NAME: my-kube-deployment |
NOTE: if you encounter with the below error when running the helm init command, please use the steps following to fix it
"Error: release nginx-ingress failed: namespaces "default" is forbidden: User "system:serviceaccount:kube-system:default" cannot get resource "namespaces" in API group "" in the namespace "default"" |
If you are getting this error when running helm install command, it is simply because you don't have the permission to deploy tiller. Therefore you need to add an account for it. Please use below commands to do so.
kubectl --namespace kube-system create serviceaccount tiller |
kubectl create clusterrolebinding tiller-cluster-rule \ |
kubectl --namespace kube-system patch deploy tiller-deploy \ |
Then run the commands below to check whether the issue has been resolved:
helm list |
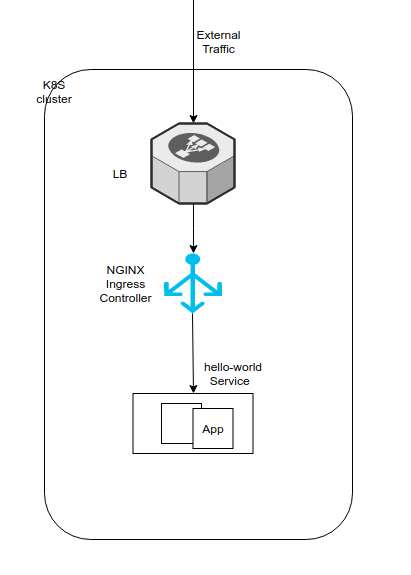
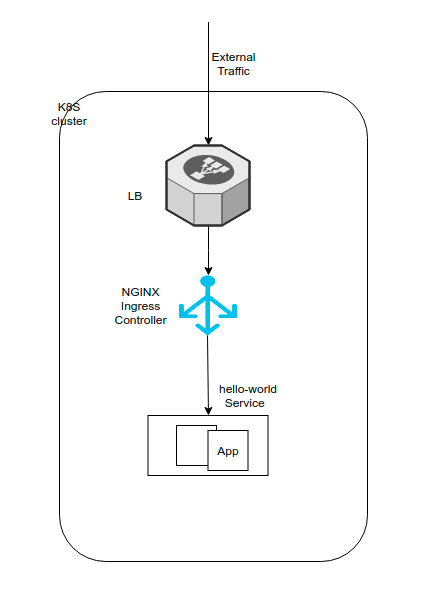
Now you have successfully created below resources in your k8s cluster using a helm chart,

Here we only expose the Nginx service as the LoadBalancer service type and the Hello-world app is exposed as the ClusterIP service. We are now going to access this ClusterIP service from the Nginx. Likewise, we can expose multiple applications in the cluster using the ClusterIP service type and access them using the same Nginx hostname. You can get a clear idea of the deployment once you go through all the YAML template files in the helm repo https://github.com/prasanjit-/helm-charts.git. let's look at the way of accessing the above hello-world application from your web browser.
If you check the services deployed in your cluster using the "kubectl get svc" command, you can see the below output.
As seen on the above, the service type of the "my-kube-deployment-my-app-service" is ClusterIP. So Now, we are going to access this ClusterIP service through the Nginx load-balancer that we have already created using helm. The ClusterIP services cannot be directly accessed from your web browser without having a proxy. In this case, our proxy is Nginx load-balancer.
Execute the below command to get the hostname of your Nginx load balancer. Because we are going to access all our Kubernetes services from this single Nginx hostname.
kubectl get svc my-kube-deployment-my-app-nginx-controller -o yaml |
This will give the below output with the nginx-hostname as follows, (Note that here I am using AWS as my cloud provider, because of that it has created an AWS ELB when exposing the nginx-service as the LoadBalancer service type)
status: |
Now you can use this URL in your browser to access our hello-world app and it will give the below output in your browser.

Now you can try making the relevant configuration changes to the Nginx ingress controller for accessing multiple apps in your Kubernetes cluster.
(Optional) Using Metal LB in a Bare Metal K8s Cluster
In case you are doing your installation in a bare metal server and where there is no provision of using "external-load balancers", the LoadBalancers will remain in the "pending" state indefinitely when created. The answer to this is MetalLB.
MetalLB can be run in two modes, layer-2 mode and bgp mode. I chose the layer-2 mode as this is very easy to install. You only have to download a YAML manifest.
curl -sfL https://raw.githubusercontent.com/google/metallb/v0.7.3/manifests/metallb.yaml > /var/lib/rancher/k3s/server/manifests/metallb.yaml |
By placing the file in /var/lib/rancher/k3s/server/manifests, it will be automatically applied. After that you have to
write a config map to metallb-system/config. I chose a small ip-range.
apiVersion: v1 |
---
apiVersion: v1 |
This YAML is the example provided MetalLB in the tutorial. After the pod is running, you can look at the nginx service with kubectl get service nginx:
admin@k3s-master-1:~ $ kubectl get service nginx |
And now if you curl http://192.168.2.151 you should see the default nginx page: "Welcome to nginx!"
No comments:
Post a Comment
Hi, Leave a comment here and one of the binary piper's will reply soon :)